There’s something almost magical about a perfectly executed classic baked cheesecake. That first bite – where the fork slides through the silky-smooth filling, the buttery graham cracker crust crumbles just right, and the rich, tangy cream cheese flavor blooms across your palate – it’s an experience that borders on transcendent. I’ve spent years perfecting my cheesecake technique, and today I’m sharing all my secrets for creating this timeless dessert that never fails to impress.
The Rich History Behind Cheesecake
Before diving into my recipe, let’s appreciate that cheesecake is actually one of the world’s oldest desserts. The ancient Greeks created the earliest recorded cheesecake around 2,000 B.C.! They pounded cheese into a paste, mixed it with honey and wheat flour, heated the mixture, and then cooled it. This early version was served to athletes during the first Olympic games in 776 B.C. as an energy source.
When the Romans conquered Greece, they modified the recipe by adding eggs and sometimes even crushed cheese curds. As the Roman Empire expanded, so did the popularity of cheesecake throughout Europe. Each region developed its own unique twist on the basic recipe.
Fast forward to the 18th century when Americans began developing their own versions. But the classic New York-style cheesecake we know and love today didn’t emerge until the 1900s, when cream cheese was invented and incorporated into the recipe. This American innovation transformed cheesecake into the dense, rich, creamy dessert that has become a staple at restaurants and bakeries worldwide.
Why My Classic Cheesecake Recipe Works
After countless tests and tweaks, I’ve developed a foolproof approach that addresses every common cheesecake problem:
- Perfectly smooth texture: My technique eliminates those annoying air bubbles and prevents cracks
- Balanced flavor: Just the right amount of sweetness with that characteristic tang
- Reliable results: Even first-time bakers can achieve bakery-quality cheesecake
- No-stress method: Water bath without the worry of leaks
The secret lies in understanding the science behind cheesecake and respecting the process. Let’s dive into the ingredients that make this dessert special.
Essential Ingredients and Why They Matter
For the crust:
- Graham crackers: Their honeyed wheat flavor creates the perfect foundation
- Butter: Binds the crumbs and adds richness
- Sugar: Just enough to enhance the graham flavor without being cloying
- Salt: A pinch intensifies all the other flavors
For the filling:
- Cream cheese: The star of the show, providing that distinctive tangy creaminess
- Sugar: Balances the tanginess without making the cheesecake too sweet
- Eggs: Provide structure while maintaining that velvety texture
- Heavy cream: Adds richness and helps create that silky-smooth consistency
- Sour cream: My secret ingredient for perfect tanginess and moisture
- Vanilla: Rounds out the flavors with warm, aromatic notes
- Lemon zest: Brightens the overall flavor profile without making it “lemony”
- Salt: Again, just a pinch to enhance all other flavors
Equipment You’ll Need
Having the right tools makes all the difference when baking cheesecake:
- 9-inch springform pan: Essential for easy removal without damaging your masterpiece
- Stand mixer or hand mixer: For perfectly smooth filling without overbeating
- Roasting pan: Large enough to hold your springform for the water bath
- Heavy-duty aluminum foil: To prevent water from seeping into your crust
- Instant-read thermometer: The most reliable way to check for doneness
Now, let’s get to the detailed recipe!
Classic Baked Cheesecake Recipe
Crust Ingredients:
- 2 cups graham cracker crumbs (about 15-16 full sheets)
- 1/4 cup granulated sugar
- 1/2 teaspoon salt
- 6 tablespoons unsalted butter, melted
Filling Ingredients:
- 32 ounces (4 blocks) full-fat cream cheese, room temperature
- 1 1/4 cups granulated sugar
- 1/2 cup sour cream, room temperature
- 2 teaspoons vanilla extract
- 1 teaspoon lemon zest (optional but recommended)
- 1/4 teaspoon salt
- 4 large eggs, room temperature
- 1/4 cup heavy cream, room temperature
For Serving (Optional):
- Fresh berries
- Berry compote
- Caramel sauce
- Chocolate ganache
- Whipped cream
Step-by-Step Instructions
Preparation (Day Before):
- Take cream cheese, sour cream, eggs, and heavy cream out of the refrigerator at least 2 hours before baking, preferably 4-6 hours. Room temperature ingredients are absolutely crucial for a smooth cheesecake.
- Adjust your oven rack to the lower-middle position and preheat the oven to 350°F (175°C).
Make the Crust:
- Combine graham cracker crumbs, sugar, and salt in a medium bowl. Add melted butter and mix until every crumb is moistened.
- Press the mixture firmly into the bottom and about 1-inch up the sides of a 9-inch springform pan. I use the bottom of a measuring cup to create an even, compact layer.
- Bake the crust for 10 minutes until it’s lightly golden. Remove from the oven and let cool completely on a wire rack.
- Once cool, wrap the outside of the pan with 2-3 layers of heavy-duty aluminum foil, making sure it comes up the sides. This prevents water from seeping in during the water bath.
Make the Filling:
- Reduce the oven temperature to 325°F (160°C).
- In the bowl of a stand mixer fitted with the paddle attachment (or using a hand mixer), beat the cream cheese on medium-low speed until completely smooth and free of lumps, about 3 minutes. Scrape down the sides of the bowl frequently.
- Gradually add the sugar and beat until well incorporated and smooth, about 2 minutes. Don’t overbeat – we don’t want to incorporate too much air.
- Add the sour cream, vanilla extract, lemon zest, and salt. Beat on low speed until combined.
- Add eggs one at a time, beating on low speed just until each is incorporated. Scrape down the sides of the bowl between additions.
- Finally, add the heavy cream and mix just until combined. The filling should be completely smooth and somewhat glossy.
Bake the Cheesecake:
- Pour the filling into the cooled crust and smooth the top with a spatula.
- Tap the pan gently on the counter a few times to bring any air bubbles to the surface. Pop visible bubbles with a toothpick.
- Place the foil-wrapped springform pan in a large roasting pan. Place in the oven and carefully pour hot water into the roasting pan until it reaches about halfway up the sides of the springform pan.
- Bake for 65-75 minutes. The cheesecake is done when the edges are set but the center still has a slight wobble when gently shaken. If you have an instant-read thermometer, the center should register 150°F (65°C).
- Turn off the oven, crack the door open about 1 inch, and let the cheesecake cool in the oven for 1 hour. This gentle cooling helps prevent cracks.
Cooling and Chilling:
- Remove the cheesecake from the water bath and unwrap the foil. Let cool completely on a wire rack at room temperature (about 2-3 hours).
- Once completely cool, cover with plastic wrap (without touching the surface) and refrigerate for at least 8 hours, preferably overnight.
Serving:
- About 30 minutes before serving, remove the cheesecake from the refrigerator.
- Run a thin knife between the cheesecake and the pan, then remove the springform ring.
- Slice with a clean, hot knife (dip in hot water and wipe dry between slices) for the cleanest cuts.
- Serve with your chosen toppings, if desired.
Troubleshooting Common Cheesecake Problems
Even with the most careful preparation, things can sometimes go wrong. Here’s how to address common cheesecake issues:
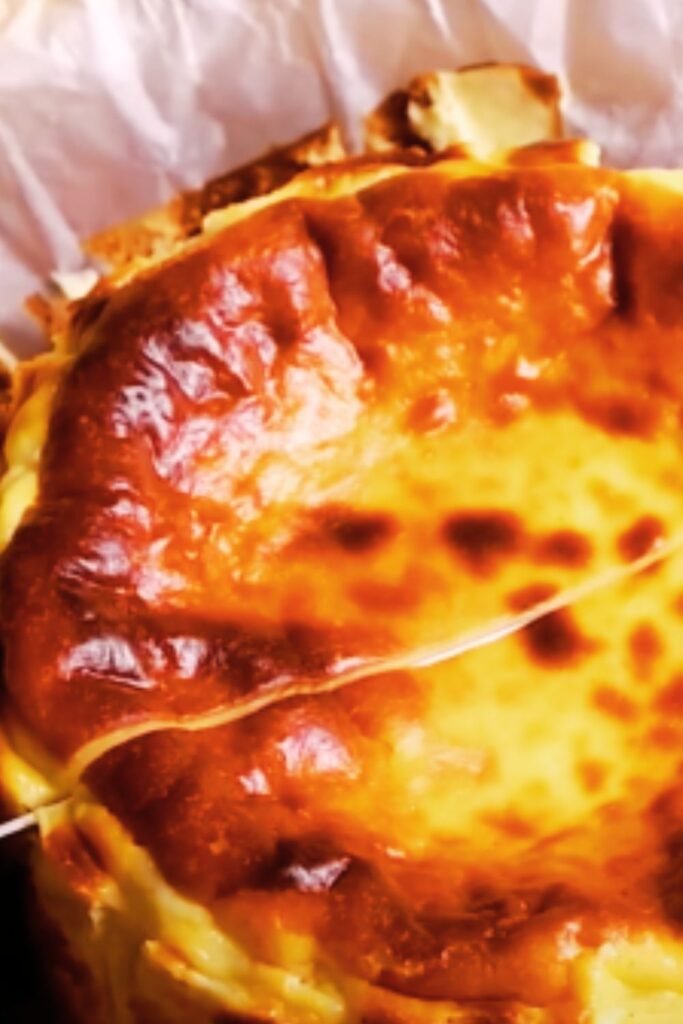
Cracked Top
- Cause: Overbeating the filling, baking at too high a temperature, or cooling too quickly
- Prevention: Beat ingredients on low speed, use a water bath, cool gradually in the oven
- Fix: Top with fruit, whipped cream, or ganache to hide the cracks
Soggy Crust
- Cause: Water seeping in during the water bath
- Prevention: Use multiple layers of heavy-duty foil or place the wrapped springform in an oven bag
- Fix: If minor, the soggy portion can be left behind when serving
Sunken Center
- Cause: Underbaking or opening the oven door during baking
- Prevention: Check for doneness with the jiggle test or thermometer, never open the door during baking
- Fix: Fill the depression with a complementary topping
Lumpy Filling
- Cause: Cold ingredients or inadequate mixing
- Prevention: Ensure all ingredients are truly at room temperature and scrape the bowl frequently
- Fix: Unfortunately, there’s no fixing this after baking. Serve with toppings to distract from texture issues
Science Behind the Perfect Cheesecake
Understanding what’s happening in your cheesecake can help you achieve better results:
| Stage | What’s Happening | Why It Matters |
|---|---|---|
| Room temperature ingredients | Fats in cream cheese become more pliable | Creates a smoother mixture without overbeating |
| Minimal mixing | Incorporates less air into the batter | Prevents rising and falling that leads to cracks |
| Water bath | Creates a humid environment and regulates temperature | Ensures gentle, even baking for silky texture |
| Low and slow baking | Proteins coagulate gradually | Prevents overcooked edges while the center is still raw |
| Gradual cooling | Allows for gentle contraction as temperature decreases | Prevents the dramatic shrinking that causes cracks |
| Long chilling | Sets the structure completely | Develops flavor and ensures clean slices |
Creative Variations to Try
Once you’ve mastered the classic cheesecake, consider these delicious variations:
Flavor Additions to the Filling:
- Citrus: Add 2 tablespoons of fresh lemon, lime, or orange juice and 1 tablespoon of zest
- Coffee: Dissolve 2 tablespoons of instant espresso powder in 1 tablespoon of hot water, cool, then add to filling
- Pumpkin Spice: Add 3/4 cup pumpkin puree and 2 teaspoons pumpkin pie spice
- Chocolate: Melt and cool 8 ounces of bittersweet chocolate, then blend into filling
Crust Alternatives:
- Chocolate: Substitute chocolate cookie crumbs for graham crackers
- Nut-based: Use 2 cups of finely ground toasted nuts with 3 tablespoons of sugar and 6 tablespoons of butter
- Shortbread: Use 2 cups of shortbread cookie crumbs instead of graham crackers
- Gingersnap: Replace graham crackers with spicy gingersnap cookies for a warming flavor
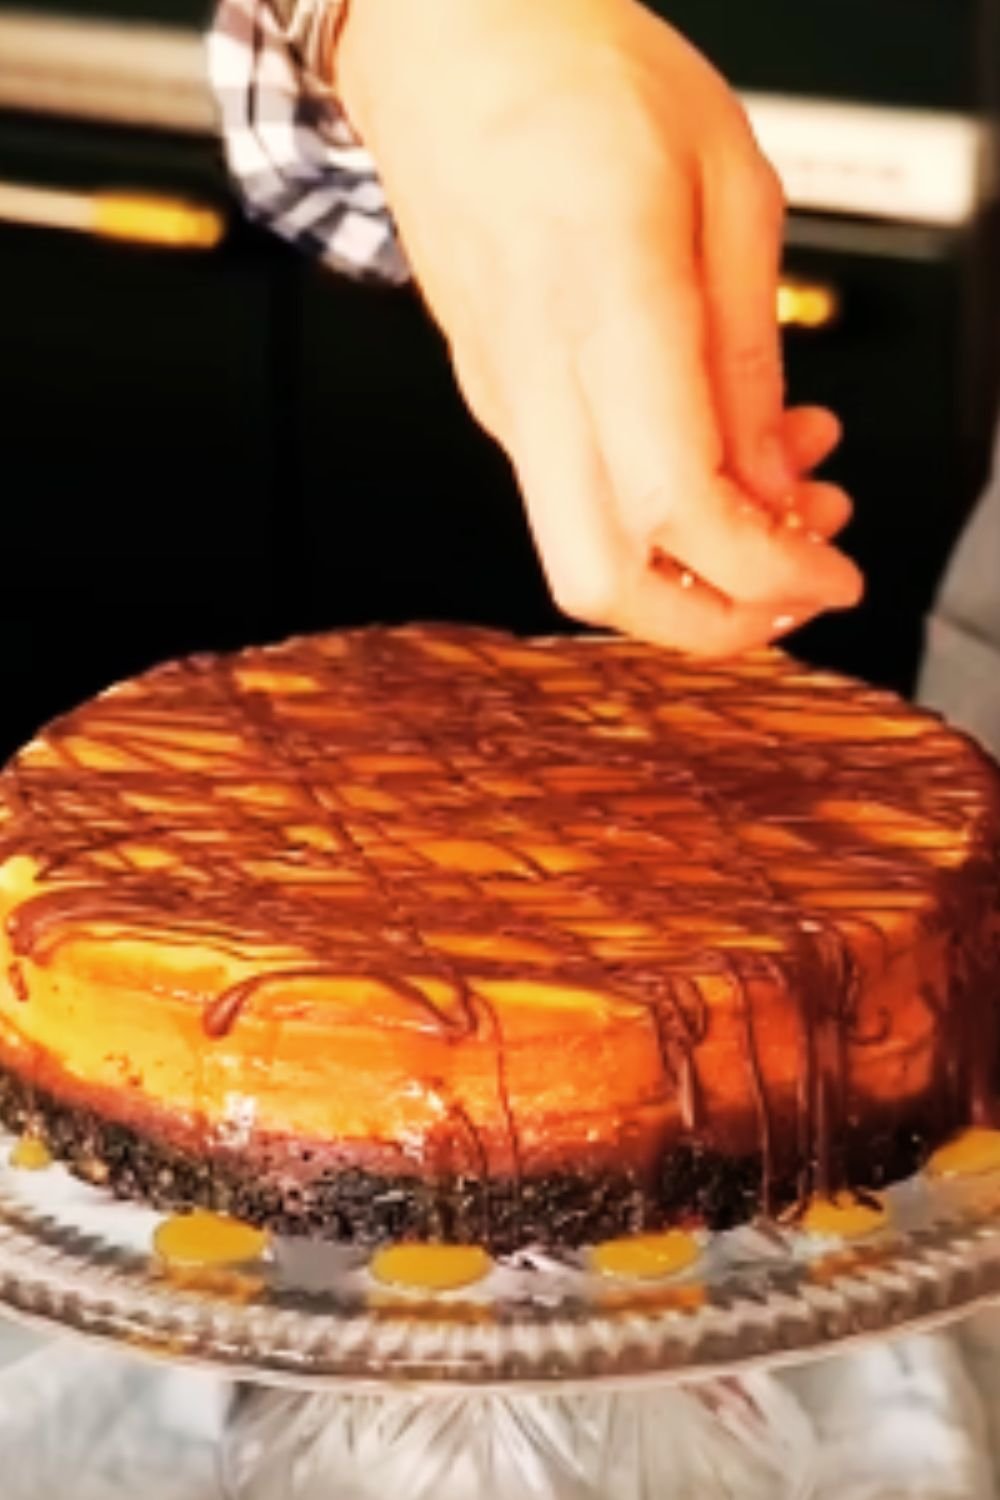
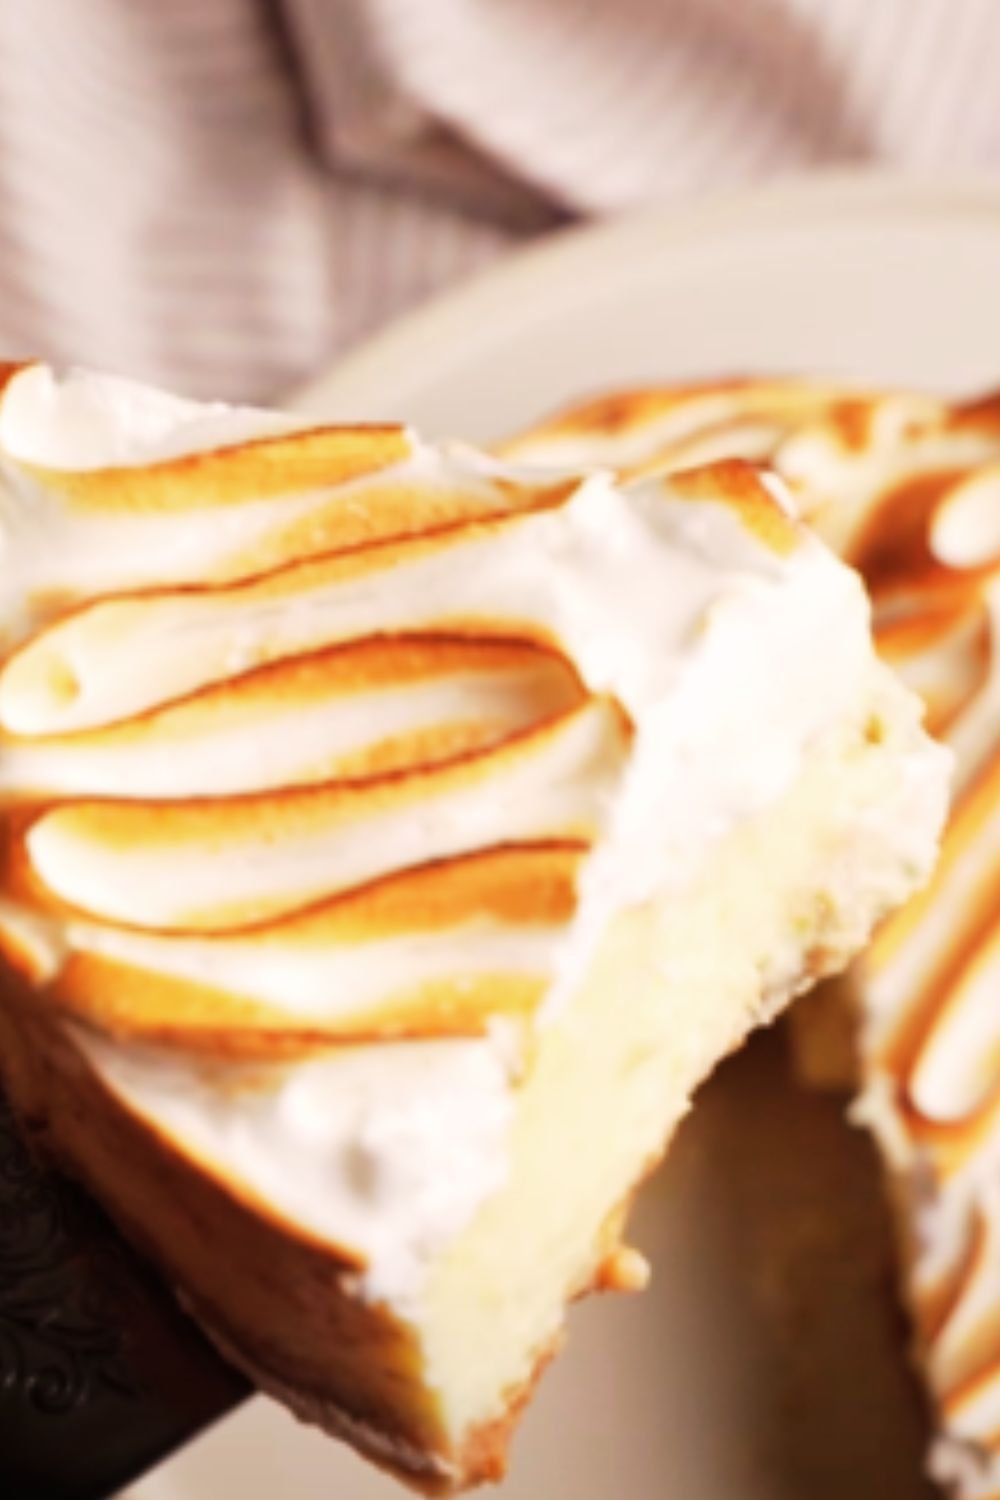
Creative Toppings:
- Fresh fruit and glaze: Arrange berries in a pattern and brush with warmed, strained apricot jam
- Chocolate ganache: Pour warm ganache over the top and let it drip down the sides
- Homemade caramel: Drizzle with salted caramel sauce and sprinkle with sea salt flakes
- Citrus curd: Spread a layer of lemon, lime, or passion fruit curd over the top
Make-Ahead and Storage Tips
One of the best things about cheesecake is that it’s an ideal make-ahead dessert:
Refrigerator Storage:
- Properly wrapped cheesecake will keep in the refrigerator for up to 5 days
- For best results, store unsliced and cover with plastic wrap once completely cool
- Add toppings just before serving for the freshest presentation
Freezer Storage:
- Cheesecake freezes beautifully for up to 2 months
- To freeze: Cool completely, then chill for at least 4 hours until firm
- Remove the sides of the springform pan and place the cheesecake (still on the bottom of the pan) on a cardboard round
- Wrap tightly in plastic wrap, then in aluminum foil
- To thaw: Transfer to refrigerator for 24 hours before serving
Serving Suggestions:
- For the cleanest slices, dip your knife in hot water and wipe dry between cuts
- If frozen, thaw completely in the refrigerator before serving
- Let sit at room temperature for about 30 minutes before serving for the best texture and flavor
Nutritional Information
While cheesecake is undoubtedly an indulgence, it’s good to know what you’re consuming:
| Nutrient | Amount per Slice (1/12 of cake) |
|---|---|
| Calories | 450-500 |
| Fat | 32-36g |
| Saturated Fat | 18-22g |
| Cholesterol | 150-180mg |
| Sodium | 300-350mg |
| Carbohydrates | 35-40g |
| Sugar | 28-32g |
| Protein | 7-9g |
Frequently Asked Questions
Q: Why did my cheesecake crack even though I followed all the instructions?
A: Even with perfect technique, cheesecakes can sometimes crack due to factors beyond your control, like humidity or variations in oven temperature. If your cheesecake cracks, don’t worry! It will still taste delicious, and you can always cover it with a topping. For your next attempt, try reducing the oven temperature by 25°F and extending the baking time slightly.
Q: Can I make this recipe without a springform pan?
A: While a springform pan is ideal, you can use a deep-dish pie plate or cake pan lined with parchment paper with long strips that extend up the sides as “handles.” Keep in mind that the cheesecake will be more difficult to remove intact, and you may need to adjust the recipe quantities for different sized pans.
Q: Do I really need to use a water bath?
A: Yes, for the best results. The water bath creates a gentle, humid environment that helps the cheesecake bake evenly and prevents cracks. If you absolutely cannot use a water bath, place a pan of water on the rack below the cheesecake to create humidity in the oven, but be prepared for possibly more cracks and less even baking.
Q: Can I use low-fat cream cheese or Greek yogurt instead of full-fat ingredients?
A: You can, but the results won’t be as rich or creamy. If you substitute low-fat ingredients, expect a slightly different texture and flavor. If you do make substitutions, I recommend using half full-fat and half reduced-fat products for a better balance.
Q: How do I know when my cheesecake is done if I don’t have a thermometer?
A: The cheesecake should be set around the edges but still have a slight wobble in the center when gently shaken (about a 2-3 inch circle in the middle should jiggle slightly). If the entire cheesecake is wobbly, it needs more time. If it doesn’t jiggle at all, it might be overcooked.
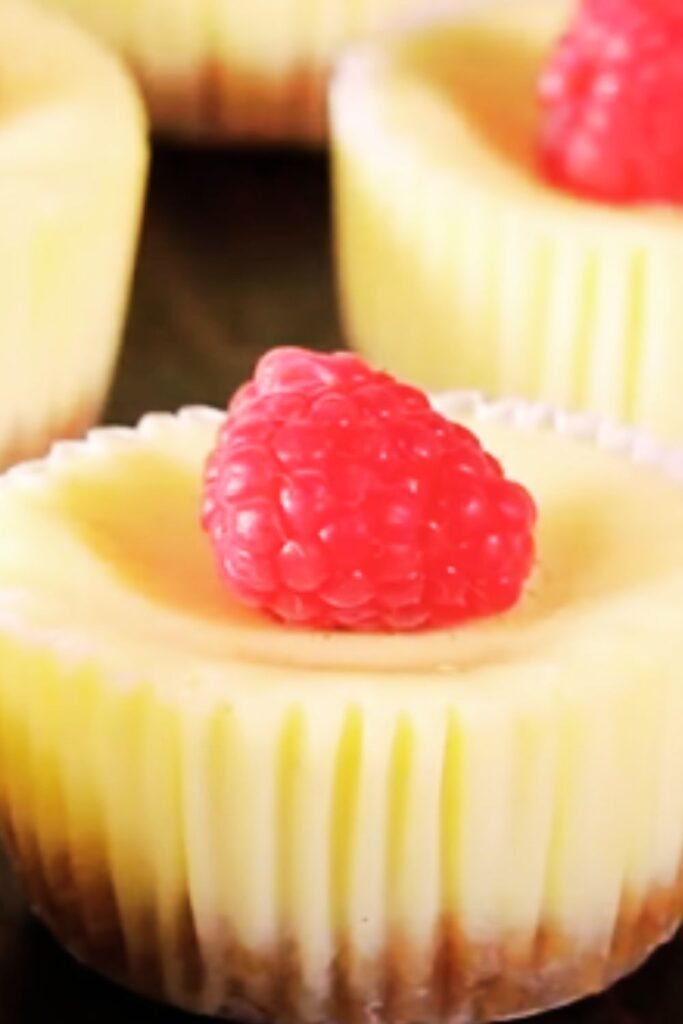
Q: Can I make mini cheesecakes using this recipe?
A: Absolutely! Use a muffin tin lined with paper liners and press a small amount of crust into each cup. Fill each about 3/4 full with batter. Bake at 325°F for about 20-25 minutes, until centers are nearly set. Cool completely before removing from the tin.
A Few Final Tips for Cheesecake Success
After years of making cheesecakes, I’ve collected these additional insights that can take your cheesecake from good to extraordinary:
- Patience is key: Almost every cheesecake problem comes from rushing some part of the process. Give yourself plenty of time for each step.
- Quality matters: With so few ingredients, using high-quality cream cheese, real vanilla extract, and fresh eggs makes a noticeable difference.
- Less is more with mixing: Once you add the eggs, mix as little as possible just to combine. Overbeating at this stage is the top cause of cracks.
- Trust your senses: Every oven is different, so use the visual and tactile cues for doneness rather than relying solely on timing.
- Practice makes perfect: Don’t be discouraged if your first cheesecake isn’t flawless. Each one you make will improve as you get a feel for the process.
Creating the perfect classic baked cheesecake is both a science and an art. With attention to detail, quality ingredients, and a bit of patience, you can create a dessert that rivals those from the finest bakeries. Whether served plain or dressed up with your favorite toppings, a well-made cheesecake is one of life’s true culinary pleasures.
I hope this guide helps you create the cheesecake of your dreams. Happy baking!