I’ve been on a quest for the perfect cinnamon roll for over a decade, and I can confidently say that my search has finally come to an end. After countless batches, kitchen disasters, and moments of pure triumph, I’ve developed what I believe to be the ultimate cinnamon roll recipe that will make your kitchen smell like heaven and your taste buds dance with joy.
There’s something magical about the combination of soft, pillowy dough wrapped around a sweet, spiced filling and topped with creamy glaze. These aren’t just any cinnamon rolls – they’re the kind that make people stop mid-conversation, close their eyes, and savor every single bite. I’ve served these at family gatherings, potluck dinners, and weekend brunches, and without fail, someone always asks for the recipe.
What makes these cinnamon rolls special isn’t just one thing – it’s the perfect harmony of technique, timing, and ingredients. I’ve learned that the secret lies in understanding your dough, respecting the process, and never rushing the rise. Today, I’m sharing every detail, every tip, and every hard-learned lesson so you can create bakery-quality cinnamon rolls in your own kitchen.
Understanding the Foundation: Essential Ingredients
Flour Selection and Its Impact
All-Purpose Flour: The backbone of our cinnamon rolls, providing structure while maintaining tenderness Bread Flour Alternative: Can substitute up to 25% for chewier texture Cake Flour Option: Replace 2 tablespoons all-purpose with cake flour for extra softness
Yeast: The Heart of Perfect Rise
Active Dry Yeast: My preferred choice for consistent results Instant Yeast: Works faster but requires temperature adjustment Fresh Yeast: Premium option when available, use 1.5 times the amount
Fat Content for Richness
Butter: Unsalted, European-style preferred for superior flavor Milk: Whole milk creates the richest dough Eggs: Large eggs at room temperature blend seamlessly
Sweetness and Spice Balance
Granulated Sugar: For the dough base Brown Sugar: Dark brown sugar in filling for molasses depth Cinnamon: Ceylon cinnamon offers delicate sweetness, Cassia provides bold warmth
The Master Recipe: Step-by-Step Perfection
Ingredients Breakdown
| Component | Ingredient | Quantity | Notes |
|---|---|---|---|
| Dough | All-purpose flour | 4 cups (480g) | Spoon and level method |
| Active dry yeast | 2¼ tsp (1 packet) | Check expiration date | |
| Granulated sugar | ¼ cup (50g) | Feeds the yeast | |
| Salt | 1 tsp | Enhances flavor | |
| Unsalted butter | 6 tbsp (85g) | Room temperature | |
| Large egg | 1 | Room temperature | |
| Whole milk | 1 cup (240ml) | Warmed to 110°F | |
| Filling | Unsalted butter | 6 tbsp (85g) | Softened |
| Dark brown sugar | ¾ cup (150g) | Packed | |
| Ground cinnamon | 2 tbsp | Fresh preferred | |
| Salt | Pinch | Enhances sweetness | |
| Glaze | Powdered sugar | 2 cups (240g) | Sifted |
| Cream cheese | 4 oz (115g) | Room temperature | |
| Butter | 4 tbsp (55g) | Softened | |
| Vanilla extract | 2 tsp | Pure vanilla | |
| Milk | 2-4 tbsp | As needed |
Dough Preparation: The Foundation of Excellence
I start by activating my yeast in warm milk – this step is crucial and tells me everything I need to know about whether my batch will succeed. The milk should feel like a comfortable bath temperature on your wrist. I add a pinch of sugar to the milk and yeast mixture, then wait for it to foam and bubble within 5-10 minutes. If nothing happens, I start over with fresh yeast.
In my large mixing bowl, I combine the flour, remaining sugar, and salt. I create a well in the center and add the activated yeast mixture, softened butter, and egg. Using a wooden spoon initially, I mix until a shaggy dough forms, then switch to kneading.
The kneading process takes about 8-10 minutes by hand, and I know it’s ready when the dough becomes smooth, elastic, and slightly tacky but not sticky. I perform the windowpane test – stretching a small piece of dough thin enough to see light through it without tearing.
First Rise: Patience Creates Perfection
I place the kneaded dough in a greased bowl, cover it with a damp towel, and let it rise in a warm, draft-free location. My favorite spot is on top of the refrigerator or in an oven with just the light on. The dough should double in size, which typically takes 1-2 hours depending on room temperature.
Rolling and Filling: Where Magic Happens
Once doubled, I punch down the dough and transfer it to a lightly floured surface. Rolling requires gentle pressure and patience – I aim for a 12×18 inch rectangle, about ¼ inch thick. The key is maintaining even thickness throughout.
For the filling, I spread softened butter evenly across the dough, leaving a ½ inch border along one long edge. I mix the brown sugar, cinnamon, and salt in a small bowl, then sprinkle this mixture evenly over the butter. The sugar should cover every buttered spot for consistent sweetness in every bite.
Rolling Technique: The Art of Tightness
Starting from the long edge opposite the clean border, I roll the dough tightly but not aggressively. I keep the roll even and compact, using both hands to maintain consistent pressure. When I reach the clean edge, I pinch the seam to seal it completely.
Cutting: Precision Matters
I use unflavored dental floss or a sharp serrated knife to cut the log into 12 equal pieces. Dental floss creates cleaner cuts without compressing the delicate layers. I slide the floss under the log, cross the ends over the top, and pull through quickly.
Second Rise: Building Final Texture
I arrange the cut rolls in a greased 9×13 inch baking dish, leaving small gaps between each roll. They’ll expand and touch during the second rise, creating those coveted pull-apart edges. This rise takes 30-45 minutes until the rolls are puffy and nearly doubled.
Baking: Achieving Golden Perfection
Temperature and Timing Guidelines
| Oven Temperature | Baking Time | Internal Temperature | Visual Cues |
|---|---|---|---|
| 350°F (175°C) | 25-30 minutes | 190°F (88°C) | Golden brown tops |
| 325°F (163°C) | 30-35 minutes | 190°F (88°C) | Slower, even browning |
| 375°F (190°C) | 20-25 minutes | 190°F (88°C) | Quick browning |
I preheat my oven to 350°F and bake the rolls for 25-30 minutes until golden brown on top. The internal temperature should reach 190°F when tested with an instant-read thermometer. I rotate the pan halfway through baking for even browning.
Glaze Preparation: Creamy Perfection
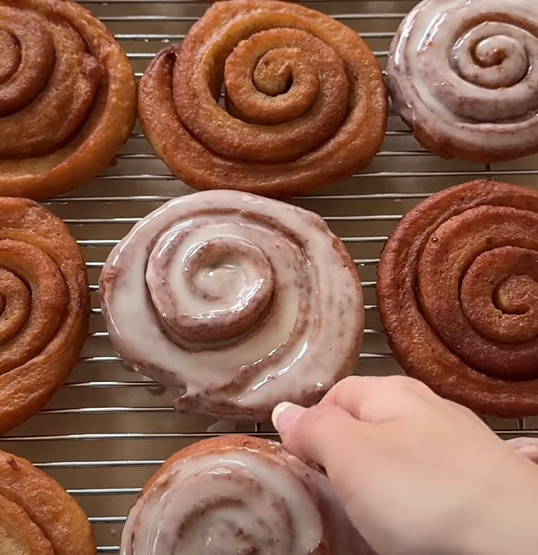
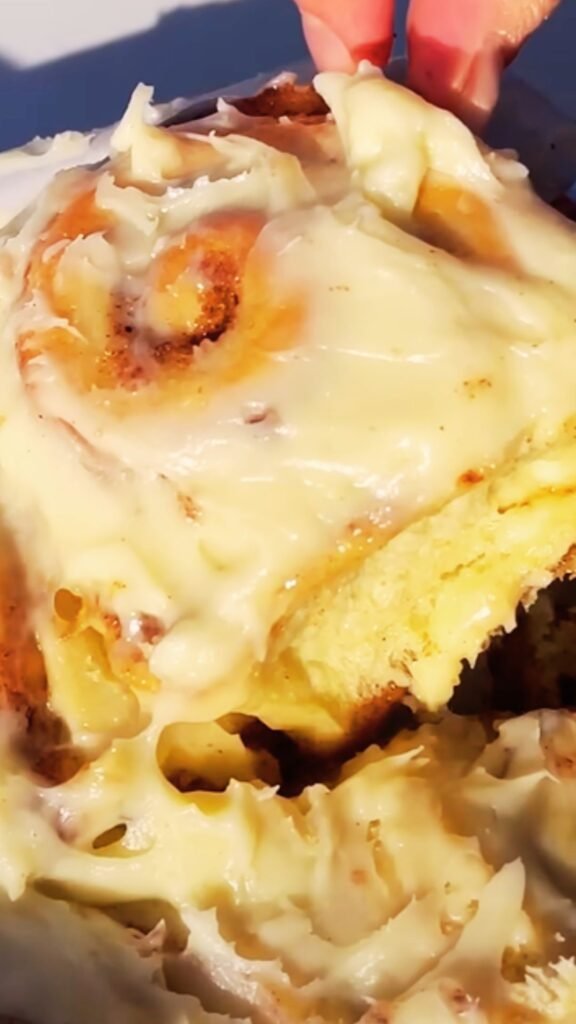
While the rolls bake, I prepare the glaze by beating together cream cheese and butter until light and fluffy. I gradually add powdered sugar, vanilla, and enough milk to achieve a pourable but thick consistency. The glaze should coat the back of a spoon but still drip easily.
Advanced Techniques and Troubleshooting
Overnight Preparation Method
For fresh morning rolls, I prepare the recipe through the cutting and arranging steps, then cover tightly and refrigerate overnight. In the morning, I remove them 30-45 minutes before baking to come to room temperature and complete their rise.
Flavor Variations and Enhancements
| Variation | Modification | Additional Ingredients |
|---|---|---|
| Orange Rolls | Add orange zest to dough | 2 tbsp orange zest, orange glaze |
| Pecan Sticky Buns | Bottom layer treatment | ½ cup pecans, caramel sauce |
| Apple Cinnamon | Filling enhancement | 1 cup diced apples, extra cinnamon |
| Chocolate Chip | Sweet addition | ½ cup mini chocolate chips |
| Cream Cheese Filled | Rich filling | 8 oz cream cheese, vanilla |
Common Issues and Solutions
Dense Rolls: Usually caused by over-flouring, under-kneading, or insufficient rising time Dry Texture: Often results from overbaking or not enough fat in the dough Uneven Browning: Rotate pan halfway through baking, check oven calibration Soggy Bottoms: Ensure proper oven temperature, don’t overcrowd the pan
Storage and Reheating Recommendations
Fresh Storage Methods
- Room temperature: Cover tightly, consume within 2 days
- Refrigerated: Up to 1 week in airtight container
- Frozen: Individual wrapping, up to 3 months
Reheating Techniques
- Microwave: 20-30 seconds for individual rolls
- Oven: 350°F for 5-8 minutes, cover with foil
- Air fryer: 300°F for 2-3 minutes
Nutritional Information and Serving Suggestions
Nutritional Breakdown (Per Roll)
| Nutrient | Amount | Daily Value % |
|---|---|---|
| Calories | 385 | 19% |
| Total Fat | 12g | 15% |
| Saturated Fat | 7g | 35% |
| Cholesterol | 45mg | 15% |
| Sodium | 220mg | 10% |
| Total Carbs | 65g | 24% |
| Dietary Fiber | 2g | 7% |
| Sugars | 28g | – |
| Protein | 6g | 12% |
Perfect Pairings
- Fresh fruit salad with seasonal berries
- Crispy bacon or breakfast sausage
- Hot coffee or chai tea
- Fresh orange juice or milk
- Vanilla Greek yogurt
- Maple syrup drizzle
Seasonal Adaptations and Holiday Variations
During fall months, I love incorporating seasonal flavors like pumpkin spice or apple cider reduction into the filling. Winter calls for eggnog-flavored glaze or cranberry-orange combinations. Spring brings opportunities for lemon zest and fresh berry additions, while summer allows for lighter glazes and fresh fruit toppings.
Questions and Answers
Q: Can I make these cinnamon rolls without a stand mixer? A: Absolutely! I actually prefer making them by hand. The key is proper kneading technique and giving yourself enough time. Hand-kneading takes 8-10 minutes of consistent work, but you’ll develop a better feel for the dough texture.
Q: Why do my cinnamon rolls always turn out dense? A: Dense rolls usually result from three main issues: using too much flour, not kneading enough, or rushing the rising process. Make sure to measure flour properly by spooning it into the cup and leveling, knead until smooth and elastic, and let the dough rise until truly doubled.
Q: Can I prepare these ahead of time for special occasions? A: Yes! You can prepare them completely and freeze before the second rise, or refrigerate overnight after shaping. For freezing, thaw overnight in the refrigerator, then allow to come to room temperature and rise before baking.
Q: What’s the best way to get an even cinnamon sugar distribution? A: Mix your cinnamon and brown sugar in a separate bowl first, then sprinkle evenly over the buttered dough. I like to use my hands to gently press the mixture into the butter, ensuring every spot is covered.
Q: How do I know when my yeast is still active? A: Active yeast will foam and bubble within 5-10 minutes when mixed with warm liquid and a pinch of sugar. If nothing happens after 10 minutes, your yeast is likely dead and needs to be replaced.
Q: Can I substitute ingredients for dietary restrictions? A: Yes, with some adjustments. For dairy-free versions, use plant-based milk and vegan butter. For reduced sugar, you can decrease the filling sugar by up to half, though texture may be slightly affected.
Q: What’s the secret to getting bakery-style soft rolls? A: The secret is in the fat content, proper hydration, and not overbaking. Make sure your dough is slightly tacky but not sticky, allow proper rising time, and bake just until golden brown, not dark brown.
Q: How can I prevent my glaze from being too thin or too thick? A: Start with less liquid than you think you need and add gradually. The glaze should coat the back of a spoon but still drip easily. If it’s too thick, add milk a teaspoon at a time. If too thin, add more powdered sugar.
Q: Why do my rolls sometimes have a yeasty taste? A: A strong yeasty flavor usually indicates over-proofing or using too much yeast. Make sure to use the correct amount of yeast and don’t let the dough rise too long, especially in warm conditions.
Q: Can I make mini cinnamon rolls instead of regular-sized ones? A: Absolutely! Cut the log into 18-24 smaller pieces instead of 12. Reduce baking time to 15-20 minutes and keep a close eye on them to prevent overbaking. Mini rolls are perfect for parties and portion control.
These cinnamon rolls have become my signature recipe, the one that friends and family request for every special occasion. The combination of tender dough, perfectly spiced filling, and creamy glaze creates a breakfast treat that’s impossible to resist. Whether you’re making them for a lazy weekend morning or a special celebration, this recipe will deliver consistent, bakery-quality results every single time.
Remember, baking is both science and art. While following the recipe precisely is important, don’t be afraid to adjust based on your environment and preferences. Trust your senses, be patient with the process, and most importantly, enjoy the incredible aroma that will fill your kitchen. These truly are the only cinnamon rolls you’ll ever need.