There’s something almost magical about the combination of butter, garlic, and mushrooms. When these three ingredients come together in a hot pan, they create an aroma that can make even the most dedicated meat-lover forget about their steak. I’ve been perfecting my garlic butter mushroom recipe for years, and I’m thrilled to share all my hard-earned secrets with you today.
What I love most about this dish is its versatility. These mushrooms can elevate a simple weeknight dinner to restaurant quality or impress guests at your next dinner party. They’re elegant enough for special occasions yet simple enough for everyday cooking. Plus, they come together in just about 15 minutes from start to finish.
Why This Recipe Works
Before diving into the recipe itself, let me explain why this particular approach to garlic butter mushrooms delivers exceptional results every time:
- High-heat cooking creates a beautiful caramelization on the mushrooms without making them soggy
- Butter and olive oil combination provides rich flavor while preventing the butter from burning
- Proper mushroom spacing in the pan ensures they sauté rather than steam
- Fresh herbs add brightness that balances the richness of the butter
- Optimal garlic timing prevents burning while maximizing flavor infusion
I’ve tested countless variations of this recipe, and this method consistently produces mushrooms that are golden brown on the outside, tender on the inside, and coated in a garlicky, herbaceous butter that you’ll want to sop up with bread (or, let’s be honest, lick directly from the plate—I won’t judge).
Ingredients You’ll Need
For this recipe, quality ingredients make all the difference. Here’s what you’ll need to serve 4 people as a side dish:
- 1½ pounds (680g) mixed mushrooms (cremini, button, shiitake, oyster, etc.)
- 4 tablespoons unsalted butter
- 2 tablespoons extra virgin olive oil
- 6 cloves garlic, minced
- 2 tablespoons fresh thyme leaves (or 1 tablespoon fresh rosemary, chopped)
- 1 tablespoon fresh parsley, finely chopped
- ½ teaspoon sea salt
- ¼ teaspoon freshly ground black pepper
- Optional: 1 tablespoon soy sauce or 2 teaspoons Worcestershire sauce (for extra umami)
- Optional: ¼ teaspoon red pepper flakes (for a touch of heat)
- Optional: 1 tablespoon fresh lemon juice (added at the end)
A Note About Mushroom Selection
I encourage you to experiment with different mushroom varieties. Each brings its own unique texture and flavor profile:
- Button mushrooms: Mild, versatile, and widely available
- Cremini (baby bella): Deeper flavor than button mushrooms, with a firm texture
- Shiitake: Rich, earthy flavor with a meaty texture (remove the tough stems)
- Oyster mushrooms: Delicate texture with a subtle seafood-like flavor
- King oyster/trumpet: Substantial, meaty texture perfect for slicing into “scallops”
- Portobello: Rich, meaty flavor (great when sliced into thick pieces)
- Chanterelle: Delicate, slightly fruity flavor with a velvety texture
- Porcini: Intensely earthy and nutty (often available dried)
- Enoki: Crisp, mild flavor, with long thin stems and tiny caps
- Maitake (hen of the woods): Complex flavor with a feathery texture
For the best flavor complexity, I recommend using at least 2-3 varieties in your mix.
Step-by-Step Preparation Guide
Let me walk you through the process of making perfect garlic butter mushrooms. The details matter in this seemingly simple recipe!
Preparing Your Mushrooms
Proper mushroom prep is crucial for the best results:
- Clean mushrooms properly: I avoid soaking mushrooms in water as they’re like little sponges. Instead, I wipe them clean with a damp paper towel or brush them with a soft mushroom brush. If they’re particularly dirty, a quick rinse is fine, but do it right before cooking and dry them thoroughly.
- Trim and cut appropriately:
- For button and cremini mushrooms: Remove any woody stem ends and either leave whole (if small), halve, or quarter them for even sizing.
- For shiitake: Remove the entire stem (they’re too tough) and slice or leave caps whole if small.
- For oyster and maitake: Tear into bite-sized pieces along the natural grain.
- For king oyster/trumpet: Slice crosswise into ½-inch rounds or lengthwise for a meatier presentation.
- For portobello: Remove gills if desired (I usually do for appearance), and slice into ½-inch strips.
- Ensure mushrooms are dry: After cleaning, pat mushrooms with paper towels to remove any excess moisture. This is absolutely essential for achieving that perfect golden-brown sear.
Cooking Process
Now for the main event – cooking these beautiful fungi to perfection:
- Heat your pan: Use a large skillet, preferably cast iron or stainless steel. Heat it over medium-high heat until it’s properly hot. A drop of water should sizzle and evaporate immediately when it hits the pan.
- Add the fats: Combine 2 tablespoons of butter and all of the olive oil in the hot pan. The oil will prevent the butter from burning while still allowing you to enjoy that rich butter flavor.
- Cook in batches if needed: This is perhaps the most crucial step that many recipes miss. Overcrowding the pan causes mushrooms to steam rather than sauté. Add only enough mushrooms to cover about half the pan’s surface in a single layer.
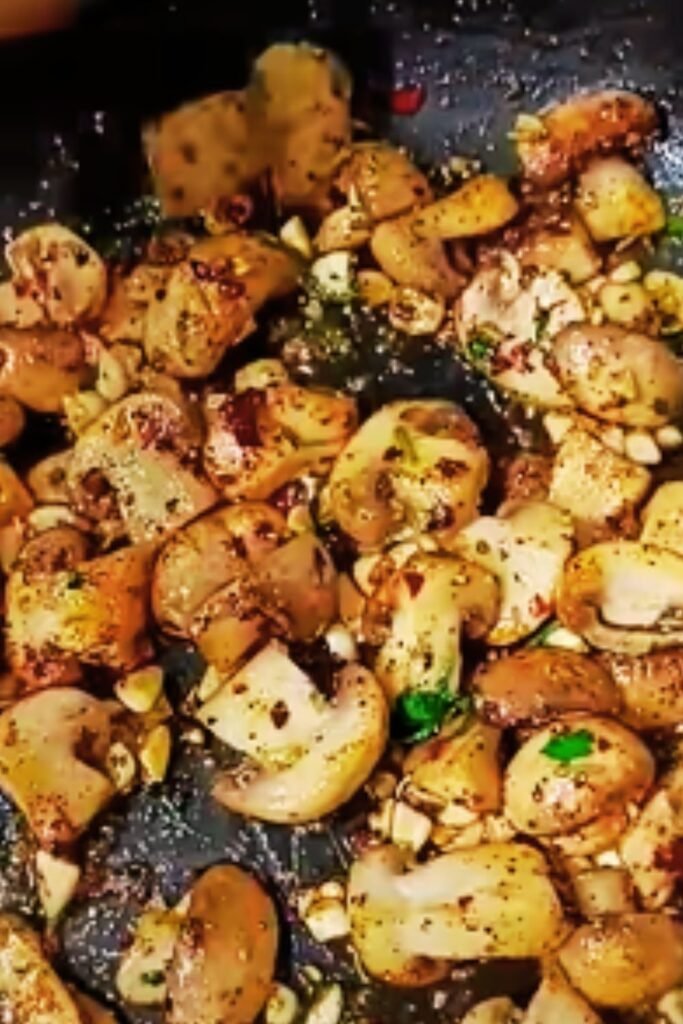
- Don’t disturb them: Once mushrooms are in the hot pan, resist the urge to stir! Let them sit undisturbed for 2-3 minutes. This develops that gorgeous golden-brown sear that gives them flavor and texture.
- Flip and continue cooking: After the first side is beautifully browned, give them a stir and continue cooking for another 2-3 minutes until most sides are golden and the mushrooms have shrunk considerably.
- Add remaining butter and seasonings: Add the remaining 2 tablespoons of butter, garlic, thyme, salt, and pepper. Reduce heat to medium-low and cook for 1-2 minutes until the garlic is fragrant but not browned.
- Optional flavor boosters: If using, add soy sauce/Worcestershire sauce and red pepper flakes now, giving everything a good stir to coat.
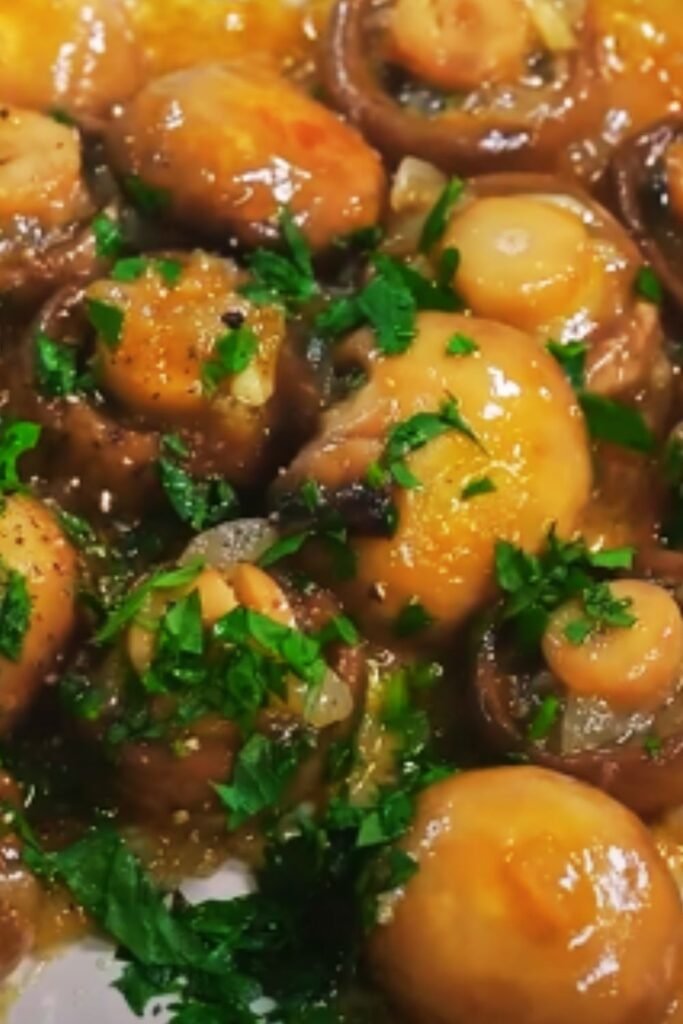
- Final touches: Remove from heat and sprinkle with fresh parsley. If using lemon juice, add it now for a bright finish.
Common Mistakes to Avoid
I’ve made plenty of mushroom cooking mistakes over the years, so let me help you avoid them:
- Stirring too frequently: This prevents proper browning and can break up delicate mushrooms.
- Crowding the pan: This is the #1 reason for soggy mushrooms. Cook in batches if needed.
- Adding garlic too early: Garlic burns easily and becomes bitter. Add it toward the end of cooking.
- Seasoning with salt too early: Salt draws moisture out of mushrooms. For extra-crispy mushrooms, salt them only after they’ve browned.
- Using too low heat: Insufficient heat leads to mushrooms releasing water and stewing rather than sautéing.
Nutritional Benefits of Mushrooms
While we’re primarily after flavor with this dish, it’s worth noting that mushrooms pack quite a nutritional punch:
| Nutrient | Benefits | Notable Mushroom Varieties |
|---|---|---|
| Vitamin D | Bone health, immune function | Maitake, portobello (especially when exposed to sunlight) |
| B Vitamins | Energy metabolism, nerve function | Cremini, shiitake, oyster |
| Selenium | Antioxidant protection | Button, cremini, shiitake |
| Potassium | Heart health, muscle function | Portobello, white button |
| Beta-glucans | Immune support, cholesterol management | Shiitake, maitake, oyster |
| Ergothioneine | Cellular protection | King oyster, maitake, shiitake |
| Dietary fiber | Digestive health | All varieties |
| Protein | Moderate amount of plant protein | All varieties, particularly portobello |
Mushrooms are also incredibly low in calories while being high in flavor, making them perfect for creating satisfying, nutritious dishes.
Serving Suggestions
I love these garlic butter mushrooms because they complement so many different main courses. Here are some of my favorite pairings:
With Proteins
- Alongside a perfectly seared steak
- Next to roasted chicken
- With grilled fish, particularly salmon or cod
- Alongside roasted pork tenderloin
- With baked tofu for a vegetarian option
With Starches
- Over creamy polenta or risotto
- Tossed with pasta (add a splash of pasta water and some parmesan)
- Served with crusty bread for sopping up the garlic butter
- Alongside fluffy mashed potatoes
- On top of a baked potato
As Part of a Vegetable Spread
- With roasted Brussels sprouts
- Alongside sautéed spinach or kale
- With roasted asparagus
- Next to ratatouille
- As part of an antipasto platter
Storage and Reheating Tips
While these mushrooms are best enjoyed immediately after cooking, sometimes we end up with leftovers. Here’s how to store and reheat them:
Storage
- Refrigerate in an airtight container for up to 3 days.
- I don’t recommend freezing cooked mushrooms, as their texture suffers dramatically.
Reheating
For the best texture when reheating:
- Stovetop method (preferred): Heat a skillet over medium heat, add a small pat of butter or drizzle of oil, and sauté the mushrooms until just heated through, about 2-3 minutes.
- Microwave method (quickest): Cover with a damp paper towel and microwave in 30-second intervals until heated through. The texture won’t be as good as the stovetop method, but it works in a pinch.
- Oven method (best for larger portions): Spread mushrooms on a baking sheet, cover with foil, and heat at 350°F (175°C) for about 10 minutes.
Recipe Variations to Try
The basic garlic butter mushroom recipe is delicious on its own, but here are some variations I’ve developed over the years:
Creamy Garlic Mushrooms
Add ¼ cup heavy cream and 2 tablespoons grated Parmesan cheese after the garlic has become fragrant. Simmer for 1-2 minutes until slightly thickened.
Asian-Inspired Ginger-Garlic Mushrooms
Reduce garlic to 3 cloves and add 1 tablespoon minced fresh ginger. Skip the thyme and instead finish with 1 tablespoon of soy sauce, 1 teaspoon of toasted sesame oil, and a sprinkle of chopped green onions.
Balsamic Garlic Mushrooms
Add 2 tablespoons of balsamic vinegar after the mushrooms have browned. Let it reduce slightly before adding the garlic and herbs.
Herbed Garlic Butter Mushrooms
Create an herb medley by using 1 teaspoon each of fresh thyme, rosemary, sage, and oregano instead of just thyme.
Blue Cheese Stuffed Mushrooms
Use large button or cremini mushrooms, remove stems, and stuff with a mixture of sautéed garlic, breadcrumbs, and crumbled blue cheese. Bake until golden.
Complete Garlic Butter Mushroom Meal Plan
Want to build an entire meal around these fantastic mushrooms? Here’s a complete dinner menu featuring garlic butter mushrooms as the star:
Appetizer
- Bruschetta with fresh tomatoes and basil
Main Course
- Garlic Butter Mushrooms (this recipe)
- Simple herb-roasted chicken or grilled steak
- Creamy polenta or parmesan risotto
Side Dish
- Simple green salad with lemon vinaigrette
- Roasted asparagus with lemon zest
Dessert
- Berry crisp with vanilla ice cream
This menu creates a balanced meal with the mushrooms taking center stage without overwhelming the palate.
Scaling the Recipe
Need to adjust the recipe for different serving sizes? Here’s a handy guide:
For 2 Servings
- 3/4 pound (340g) mixed mushrooms
- 2 tablespoons unsalted butter
- 1 tablespoon olive oil
- 3 cloves garlic
- 1 tablespoon fresh thyme
- 1/2 tablespoon fresh parsley
- 1/4 teaspoon salt
- 1/8 teaspoon pepper
For 8 Servings
- 3 pounds (1360g) mixed mushrooms
- 8 tablespoons (1 stick) unsalted butter
- 4 tablespoons olive oil
- 12 cloves garlic
- 4 tablespoons fresh thyme
- 2 tablespoons fresh parsley
- 1 teaspoon salt
- 1/2 teaspoon pepper
For larger gatherings, I recommend cooking in multiple batches rather than overcrowding the pan, even if you’re using a very large skillet.
Equipment Recommendations
To make the perfect garlic butter mushrooms, I recommend:
Essential Equipment
- Large skillet: A 12-inch cast iron skillet is ideal for its heat retention and natural non-stick properties once seasoned. Stainless steel is also excellent.
- Wooden spoon or silicone spatula: For stirring without damaging your pan or breaking up delicate mushrooms.
- Sharp knife: For proper mushroom preparation.
- Cutting board: Preferably wood or plastic dedicated to produce.
Optional but Helpful
- Garlic press: For quickly mincing garlic.
- Microplane: For zesting citrus if adding lemon zest.
- Herb scissors: For quickly chopping fresh herbs.
Frequently Asked Questions
Here are answers to some common questions about making garlic butter mushrooms:
Why are my mushrooms soggy instead of caramelized? This typically happens when mushrooms are overcrowded in the pan or cooked at too low a temperature. Make sure your pan is hot before adding mushrooms, and cook in batches if necessary. Also, ensure mushrooms are dry before cooking and avoid stirring too frequently.
Can I use dried herbs instead of fresh? Yes, but use about 1/3 the amount as dried herbs are more potent. Add dried herbs earlier in the cooking process to allow them time to rehydrate and release their flavors.
Is there a substitute for butter to make this dairy-free? Absolutely! You can use olive oil exclusively or a good quality dairy-free butter alternative. Coconut oil also works well with mushrooms but will add a slight coconut flavor that changes the profile of the dish.
How can I tell when mushrooms are perfectly cooked? Perfectly cooked mushrooms will be golden brown on multiple sides, significantly reduced in size (they’ll lose about 50% of their volume), and tender all the way through when pierced with a fork.
My garlic always burns. What am I doing wrong? You’re probably adding it too early. Add garlic only after the mushrooms have browned and reduce the heat when you do. Garlic needs just 1-2 minutes to become fragrant without burning.
Can I prepare these mushrooms ahead of time for a dinner party? You can clean and slice the mushrooms up to a day ahead (store in a paper bag in the refrigerator), but I recommend cooking them just before serving for the best texture and flavor. If absolutely necessary, you can cook them 1-2 hours ahead and reheat gently over low heat with an extra pat of butter.
What’s the best way to clean mushrooms without making them soggy? Wipe them with a damp paper towel or soft mushroom brush. If they’re very dirty, a quick rinse is fine, but dry them thoroughly afterward with paper towels.
Troubleshooting Common Issues
Even experienced cooks can encounter challenges when preparing mushrooms. Here’s how to fix common problems:
Problem: Mushrooms releasing too much liquid
Solution: Increase heat, ensure pan isn’t overcrowded, and consider cooking in smaller batches. Also, make sure mushrooms are dry before adding to the pan.
Problem: Butter burning before mushrooms are done
Solution: Use the combination of butter and olive oil as recommended, or start with only olive oil and add butter later in the cooking process.
Problem: Garlic tastes bitter
Solution: Add garlic later in the cooking process and reduce heat when you do. Garlic should only cook for 1-2 minutes until fragrant.
Problem: Mushrooms sticking to the pan
Solution: Ensure pan is properly heated before adding fats, and don’t move the mushrooms until they’ve had a chance to develop a sear.
Problem: Herbs turning black
Solution: Add delicate fresh herbs like parsley at the very end of cooking, off the heat.
Conclusion
Garlic butter mushrooms are one of those simple yet magical dishes that prove you don’t need complicated techniques or exotic ingredients to create something extraordinary. The key is understanding the nature of mushrooms – how they release moisture, how they absorb flavors, and how they transform with proper heat.
I hope this guide helps you create perfectly caramelized, deeply flavored, and utterly addictive garlic butter mushrooms. Whether served as a side dish, spooned over grilled meats, or simply enjoyed on their own with a slice of crusty bread, these mushrooms deserve a regular spot in your cooking rotation.
Remember, cooking is about joy and exploration. Don’t be afraid to adjust this recipe to your taste preferences – add different herbs, experiment with mushroom varieties, or try some of the variations I’ve suggested. The most important ingredient is always your own creative touch.
Happy cooking!
Q&A Section
Are mushrooms actually healthy or are they mostly water with no nutritional value? Mushrooms are surprisingly nutritious despite their high water content! They’re low in calories but packed with essential nutrients including B vitamins, selenium, potassium, copper, and vitamin D (especially when exposed to sunlight). They also contain unique compounds like beta-glucans and ergothioneine that support immune function and provide antioxidant benefits. Plus, their meaty texture and umami flavor make them an excellent ingredient for satisfying, nutritious meals.
How do I know which mushrooms to buy at the grocery store? Look for mushrooms that are firm, dry to the touch (not slimy), and free from dark spots or bruising. They should have a fresh, earthy smell – avoid any that have a strong, ammonia-like odor. The caps should be tightly attached to the stems. For cremini and button mushrooms, closed caps generally indicate younger mushrooms with milder flavor, while open caps with exposed gills suggest more mature mushrooms with deeper flavor.
Does washing mushrooms really make them waterlogged? This is somewhat of a culinary myth! While mushrooms do absorb some water, quick rinsing doesn’t significantly impact their texture or cooking performance. The key is to rinse them very briefly right before cooking and pat them thoroughly dry. However, wiping with a damp paper towel or using a mushroom brush is still the preferred method for delicate varieties or when you want absolutely optimal browning.
Can I really not store mushrooms in plastic bags? Correct! Storing mushrooms in plastic bags causes them to become slimy and deteriorate faster. Instead, keep them in their original packaging (which typically has ventilation holes) or in a paper bag in the refrigerator. This allows them to breathe while maintaining just enough moisture. For an extra tip, I sometimes place a paper towel in the container to absorb excess moisture.
Why do my mushrooms sometimes turn out rubbery? Rubbery mushrooms usually result from one of two cooking mistakes: either cooking them at too low a temperature, which causes them to release water and steam rather than sauté, or overcooking them past the point where they’ve released their moisture and started to caramelize. For perfect texture, use high heat initially to quickly evaporate moisture, then reduce heat slightly to finish cooking once they’ve begun to brown.