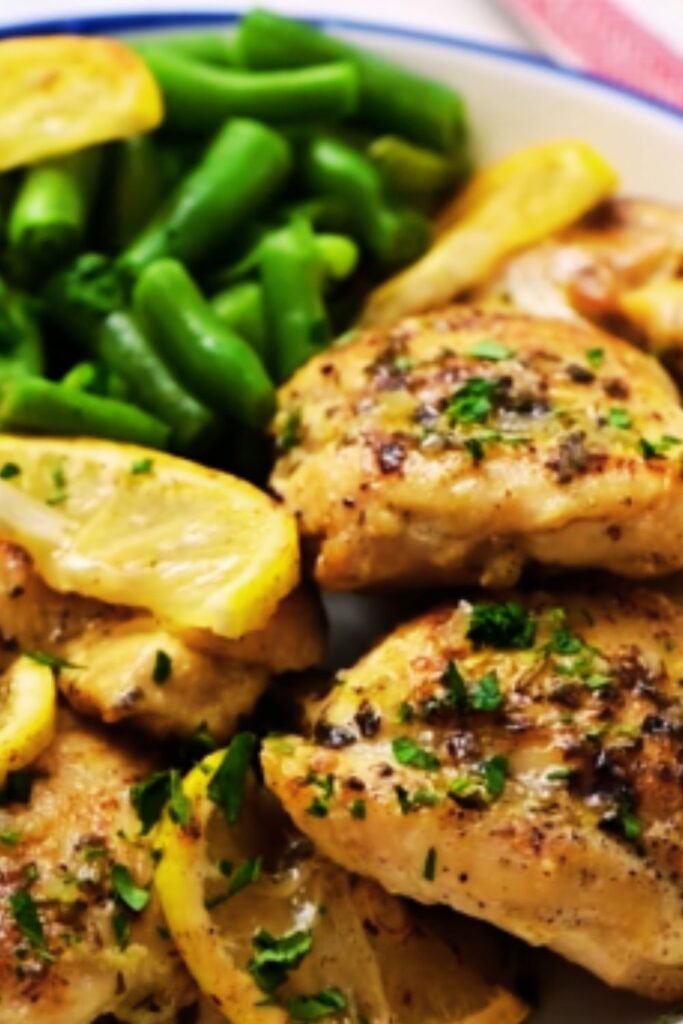
There’s something magical about a dish that delivers big on flavor while keeping cleanup to a minimum. That’s why this One Skillet Lemon Garlic Chicken has become a staple in my weeknight dinner rotation. The combination of tender chicken thighs, bright lemon, aromatic garlic, and herbs creates a restaurant-worthy meal that comes together in just 30 minutes. Plus, everything cooks in a single skillet, meaning less time washing dishes and more time enjoying good food with the people you love.
I first developed this recipe years ago when I was in a cooking rut, desperately seeking something that was both impressive and easy. After several tries, I landed on this perfect balance of simplicity and flavor. The sauce is truly the star—silky, tangy, and rich all at once. It’s the kind of meal that makes people think you’ve spent hours in the kitchen, when in reality, it’s one of the easiest dishes in my repertoire.
Ingredients
For the Chicken:
- 2 lbs (about 6-8) bone-in, skin-on chicken thighs
- 1 tablespoon olive oil
- 1 teaspoon kosher salt
- ½ teaspoon black pepper
- ½ teaspoon dried oregano
- ½ teaspoon dried thyme
- ¼ teaspoon paprika
For the Lemon Garlic Sauce:
- 6 cloves garlic, minced (about 2 tablespoons)
- 2 tablespoons butter
- ¼ cup chicken broth
- ¼ cup fresh lemon juice (about 2 medium lemons)
- 1 tablespoon honey
- 1 teaspoon lemon zest
- 2 tablespoons fresh parsley, chopped
- 1 tablespoon fresh thyme leaves (or 1 teaspoon dried)
- ¼ teaspoon red pepper flakes (optional)
- 1 lemon, sliced into rounds
Kitchen Equipment Needed
| Equipment | Purpose |
|---|---|
| 12-inch cast iron skillet | For searing chicken and making sauce |
| Tongs | For flipping chicken safely |
| Meat thermometer | For checking chicken doneness |
| Sharp knife | For prep work |
| Cutting board | For prep work |
| Microplane or zester | For zesting lemon |
| Measuring spoons and cups | For accurate measurements |
| Small bowl | For mixing seasonings |
Instructions
Step 1: Prepare the Chicken
- Pat chicken thighs dry with paper towels. This is crucial for getting that perfect golden-brown sear.
- In a small bowl, mix together salt, pepper, dried oregano, dried thyme, and paprika.
- Season chicken thighs generously on both sides with the spice mixture.
- Let the chicken sit at room temperature for 15 minutes to take the chill off and allow the seasonings to penetrate.
Step 2: Sear the Chicken
- Heat a 12-inch cast iron skillet over medium-high heat.
- Add olive oil and let it get shimmering hot.
- Place chicken thighs skin-side down in the hot skillet, being careful not to overcrowd (work in batches if necessary).
- Let the chicken cook undisturbed for 6-7 minutes until the skin is deeply golden and crispy.
- Flip chicken and cook for another 5-6 minutes on the second side.
- Check the internal temperature—it should read about 155°F (it will continue cooking later).
- Transfer chicken to a plate and set aside.
Step 3: Make the Lemon Garlic Sauce
- Reduce heat to medium and add butter to the same skillet with all those delicious chicken drippings.
- Once butter is melted, add minced garlic and cook for 30 seconds until fragrant (be careful not to burn it).
- Pour in chicken broth and use a wooden spoon to scrape up all the browned bits from the bottom of the pan—this is where the magic happens!
- Add lemon juice, honey, and lemon zest, stirring to combine.
- Let the sauce simmer for 2-3 minutes until it begins to reduce slightly.
- Stir in half of the fresh parsley, thyme, and red pepper flakes if using.
Step 4: Finish the Dish
- Return chicken thighs to the skillet, skin-side up, nestling them into the sauce.
- Arrange lemon slices between the chicken pieces.
- Reduce heat to medium-low, cover the skillet (if you don’t have a lid, use foil), and simmer for 5-7 minutes until chicken reaches an internal temperature of 165°F.
- Uncover and simmer for an additional 2-3 minutes to reduce the sauce slightly if needed.
- Sprinkle with remaining fresh herbs before serving.
Nutrition Information
| Nutrient | Amount per Serving |
|---|---|
| Calories | 385 |
| Protein | 28g |
| Fat | 24g |
| Saturated Fat | 7g |
| Carbohydrates | 8g |
| Fiber | 0.5g |
| Sugar | 5g |
| Sodium | 510mg |
| Cholesterol | 165mg |
| Vitamin C | 15% DV |
| Iron | 10% DV |
| Calcium | 4% DV |
*Based on 4 servings using 2 lbs of bone-in, skin-on chicken thighs
Pro Tips for Perfect Lemon Garlic Chicken
Getting the Crispiest Skin
The key to crispy chicken skin is starting with DRY chicken thighs. I always pat mine thoroughly with paper towels before seasoning. Also, resist the urge to move the chicken around while it’s searing—let it develop that golden crust undisturbed.
Balancing the Lemon Flavor
Too much lemon can overpower, while too little gets lost. I’ve found that ¼ cup of fresh juice plus 1 teaspoon of zest gives the perfect brightness without becoming harsh. If you’re sensitive to acidity, start with less and adjust to taste.
Don’t Skip the Room Temperature Step
Letting the chicken sit out for 15 minutes before cooking ensures even cooking. Cold chicken straight from the refrigerator will cook unevenly and potentially splash more when it hits the hot pan.
Cast Iron Is King
While any oven-safe skillet will work, cast iron gives the best sear and heat retention. If you don’t have cast iron, a heavy stainless steel pan is your next best option.
Make-Ahead and Storage Tips
Meal Prep
You can season the chicken up to 24 hours in advance and keep it covered in the refrigerator. This not only saves time but actually enhances flavor as the seasonings penetrate the meat.
Storage
Store leftover chicken and sauce in an airtight container in the refrigerator for up to 3 days. The flavors actually improve overnight as the chicken absorbs more of the lemon garlic goodness.
Reheating
For best results, reheat chicken in a 350°F oven for about 15 minutes, or until warmed through. Microwaving works in a pinch but may make the skin soggy. I like to add a splash of chicken broth when reheating to keep everything moist.
Freezing
This dish can be frozen for up to 3 months. Thaw overnight in the refrigerator before reheating. The sauce may separate slightly when thawed, but a quick stir while reheating will bring it back together.
Serving Suggestions
This One Skillet Lemon Garlic Chicken pairs beautifully with so many sides. Here are my favorite ways to serve it:
Starchy Sides
- Fluffy rice pilaf to soak up all that incredible sauce
- Creamy mashed potatoes with a touch of garlic
- Crusty artisan bread for sauce-mopping duties
- Buttered egg noodles tossed with fresh parsley
Vegetable Sides
- Roasted asparagus with lemon zest
- Sautéed broccolini with red pepper flakes
- Simple green salad with light vinaigrette
- Steamed green beans with slivered almonds
Recipe Variations
Mediterranean Version
Add olives, capers, and artichoke hearts to the sauce along with a sprinkle of crumbled feta before serving.
Creamy Adaptation
Stir in ¼ cup of heavy cream or coconut milk at the end for a richer, more decadent sauce.
Herb Garden Twist
Experiment with different herb combinations—rosemary and sage offer a earthier flavor profile, while basil and mint create a fresher, more summery dish.
Spicy Kick
Double the red pepper flakes and add a diced jalapeño to the sauce for those who like heat.
Common Mistakes to Avoid
Overcrowding the Pan
Working in batches might take a little longer, but it ensures proper browning. Overcrowding leads to steaming instead of searing.
Using Cold Lemons
Room temperature lemons yield significantly more juice than cold ones. If you forget to take them out ahead of time, microwave them for 10 seconds or roll them firmly on the counter while pressing down.
Burning the Garlic
Garlic goes from perfectly golden to bitter and burnt in seconds. Keep a close eye on it and have your next ingredients ready to go into the pan to stop the cooking process if needed.
Not Testing for Doneness
Different-sized chicken pieces will cook at different rates. Always use a meat thermometer rather than relying solely on timing.
Why This Recipe Works
What makes this One Skillet Lemon Garlic Chicken so special? It’s all about building layers of flavor:
- First, we develop beautiful caramelization on the chicken skin.
- Then, we use those browned bits (called fond) as the foundation for our sauce.
- The combination of fat (butter), acid (lemon), sweetness (honey), and aromatics (garlic and herbs) creates perfect balance.
- Finally, returning the chicken to the sauce allows the flavors to meld together while keeping the meat juicy.
The beauty of this cooking method is that it follows classic culinary techniques while remaining approachable for home cooks of any skill level.

Frequently Asked Questions
Can I use boneless, skinless chicken breasts instead of thighs? Yes, but you’ll need to adjust the cooking time. Chicken breasts cook faster and can dry out more easily. Sear them for 4-5 minutes per side, and reduce the final simmering time to about 3-4 minutes. For best results, use breasts of even thickness or pound them to an even thickness before cooking.
How do I know when the chicken is done? The most reliable method is using a meat thermometer inserted into the thickest part of the thigh without touching bone. It should read 165°F. If you don’t have a thermometer, cut into the thickest part—the juices should run clear, and the meat should no longer be pink.
Can this recipe be doubled? Absolutely! Just use a larger skillet or cook in batches. When doubling the sauce ingredients, you may not need to double the chicken broth—start with 1.5 times the amount and adjust as needed.
Is this recipe dairy-free? The butter adds richness to the sauce, but you can substitute olive oil or a plant-based butter alternative for a dairy-free version.
What if my sauce is too thin? If your sauce seems too watery, remove the chicken after it’s fully cooked and boil the sauce over medium-high heat for a few minutes until it reduces and thickens. Another option is to mix 1 teaspoon of cornstarch with 1 tablespoon of cold water, then stir this slurry into the simmering sauce.
Can I add vegetables to make this a complete one-pan meal? Definitely! Hardy vegetables like quartered red potatoes or thick carrot chunks can be added during the initial chicken searing stage. Quick-cooking vegetables like spinach, cherry tomatoes, or zucchini can be stirred in during the final few minutes of cooking.
My chicken skin didn’t get crispy. What went wrong? The most common culprits are: 1) The chicken wasn’t dry enough before cooking, 2) The pan wasn’t hot enough when you added the chicken, 3) You moved the chicken too much during searing, or 4) The pan was overcrowded.
Final Thoughts
This One Skillet Lemon Garlic Chicken has saved me on countless busy weeknights while still feeling special enough for weekend entertaining. The bright, punchy flavors and minimal cleanup make it a true kitchen hero. I love seeing the looks on people’s faces when they take that first bite—the perfect balance of tangy lemon, mellow garlic, and juicy chicken never fails to impress.
What I appreciate most about this recipe is its versatility. Switch up the herbs, add different vegetables, serve it with various sides—it’s nearly impossible to go wrong. Even better, most of the ingredients are pantry and refrigerator staples, meaning you can probably make this tonight without a special trip to the grocery store.
So grab your favorite skillet, a few lemons, and some chicken thighs, and prepare to add this to your regular rotation. Trust me, your taste buds (and whoever you’re feeding) will thank you!