There’s something incredibly satisfying about pulling a freshly baked loaf of ciabatta from the oven. That moment when the kitchen fills with the aroma of yeasty goodness, and you’re faced with a golden-brown crust just begging to be torn into – it’s pure culinary magic. I’ve been baking bread for over a decade, and I can confidently say that ciabatta, despite its artisanal reputation, is one of the most approachable rustic breads for home bakers.
Many people shy away from making ciabatta at home, intimidated by its irregular holes and unique texture. But I’m here to tell you that with a few simple techniques and a bit of patience, you can create bakery-quality ciabatta in your own kitchen. This traditional Italian bread, with its airy interior and crispy crust, might just become your new weekend baking project.
What Makes Ciabatta Special?
Ciabatta is distinctive among bread varieties for several reasons:
- High hydration dough: Ciabatta uses a very wet dough (around 75-85% hydration), which creates its signature open crumb structure.
- No-knead technique: Unlike many breads that require extensive kneading, ciabatta relies on time and gentle handling.
- Rustic shape: The name “ciabatta” means “slipper” in Italian, referring to its flat, somewhat irregular shape.
- Versatility: From sandwiches to dipping in olive oil, ciabatta serves countless culinary purposes.
The bread originated in Italy in 1982 when a baker named Arnaldo Cavallari created it as a response to the popularity of French baguettes. Today, it’s beloved worldwide for its distinctive chew and flavor.
Understanding the Ingredients
Before we dive into making ciabatta, let’s break down what each ingredient contributes to our final loaf:
Bread Flour : Provides the protein structure necessary for good gluten development. The higher protein content (compared to all-purpose flour) gives our ciabatta its chewy texture.
Water : Creates steam during baking which helps form the open crumb structure. The high water content (higher than in most bread recipes) is essential for authentic ciabatta.
Yeast : The leavening agent that ferments sugars in the flour, producing carbon dioxide that makes our bread rise. I use instant yeast for reliability and convenience.
Salt : Beyond flavor, salt strengthens gluten structure and controls yeast activity. Never skip it!
Olive oil : While not in all ciabatta recipes, a small amount adds flavor and helps with the texture of the crust.
The Secret to Great Ciabatta: The Biga
The key to developing deep flavor in ciabatta is starting with a pre-ferment called a “biga.” This is essentially a starter dough that ferments for several hours (or overnight), developing complex flavors and beginning gluten formation.
I always make my biga the night before baking. Those extra hours of fermentation make a remarkable difference in the final taste of your bread – it’s the difference between a good loaf and an exceptional one.

Easy Ciabatta Bread Recipe
For the Biga (Starter):
- 100g bread flour
- 100g water (room temperature)
- 1/4 teaspoon instant yeast
For the Main Dough:
- All of the prepared biga
- 400g bread flour
- 300g water (room temperature)
- 10g salt
- 5g (1 1/2 teaspoons) instant yeast
- 15g (1 tablespoon) olive oil
Equipment Needed:
- Digital kitchen scale (highly recommended for accuracy)
- Large mixing bowl
- Dough scraper (plastic or metal)
- Baking sheet or pizza stone
- Parchment paper
- Spray bottle for water
Detailed Method
Day 1: Prepare the Biga
- In a medium bowl, mix the flour, water, and yeast for the biga until no dry flour remains.
- Cover with plastic wrap and let sit at room temperature for 12-16 hours. The mixture will become bubbly and have a slightly sour aroma.
Day 2: Making the Ciabatta Dough
- Add the biga to a large bowl along with the main dough ingredients except the salt. Mix until roughly combined.
- Let the dough rest (autolyse) for 20-30 minutes. This allows the flour to fully hydrate and gluten to begin developing.
- Add the salt and mix until incorporated.
- Perform a series of “stretch and folds” over the next 2 hours:
- With wet hands, grab one side of the dough, stretch it upward, and fold it over itself.
- Rotate the bowl 90 degrees and repeat.
- Do this for all four sides of the dough.
- Perform this sequence every 30 minutes for 2 hours (4 sets total).
- Let the dough rise until doubled in size, approximately 1-1.5 hours after your final stretch and fold.
Shaping and Baking
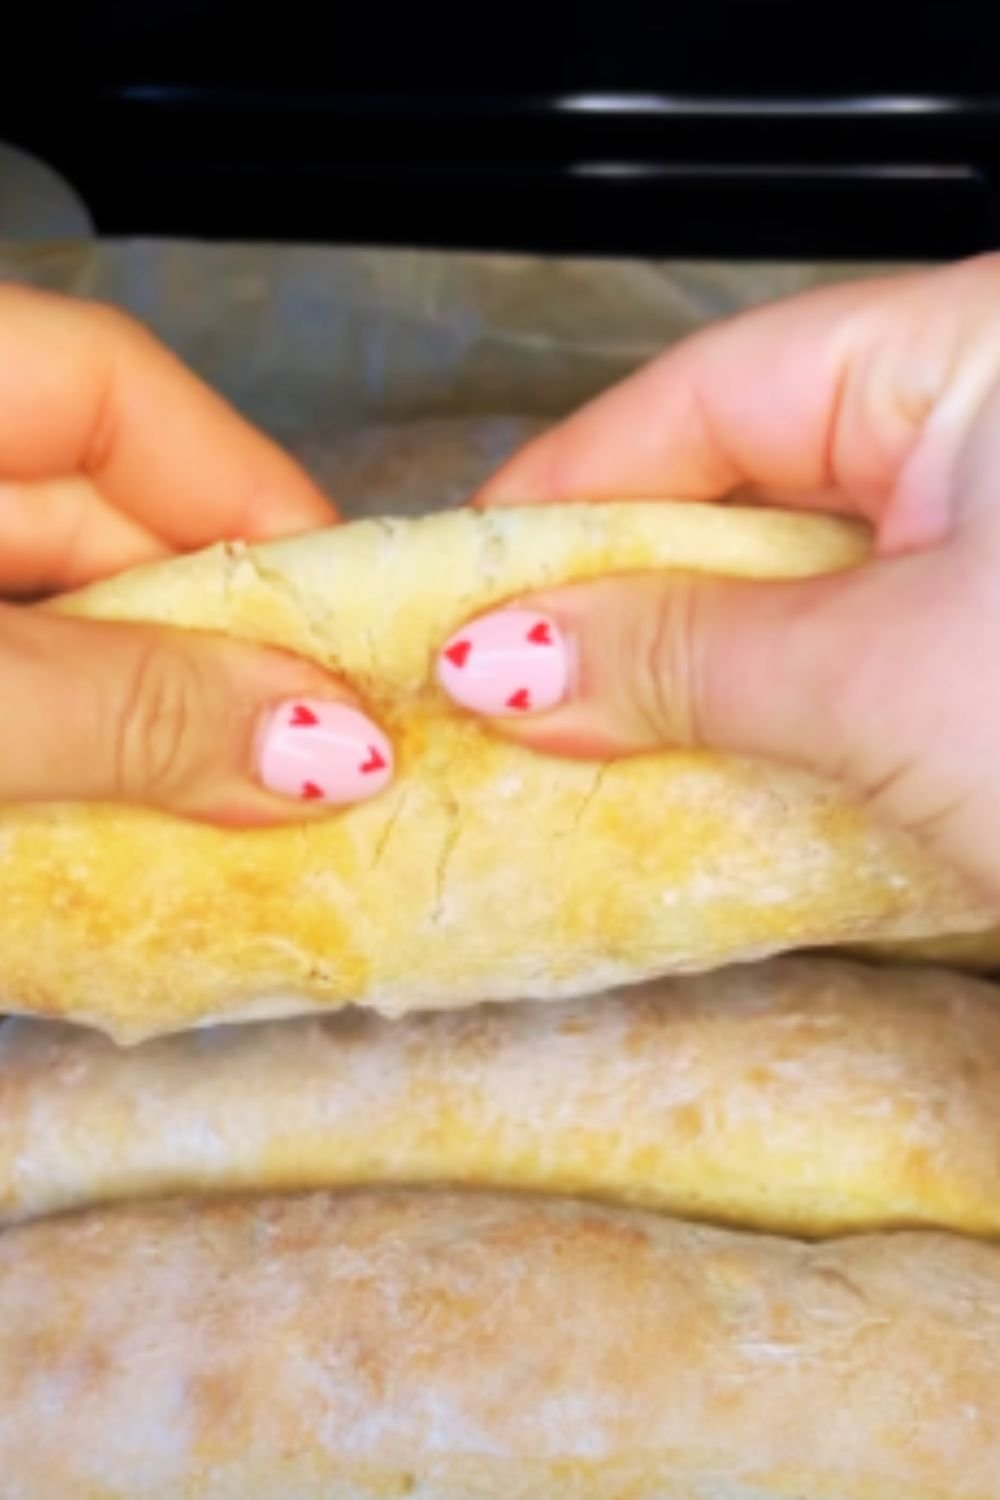
- Prepare your work surface by generously flouring it. This dough is wet and will stick without adequate flour.
- Gently turn out the dough onto the floured surface, being careful not to deflate it.
- Cut the dough into two equal pieces for loaves (or four for rolls) using a dough scraper.
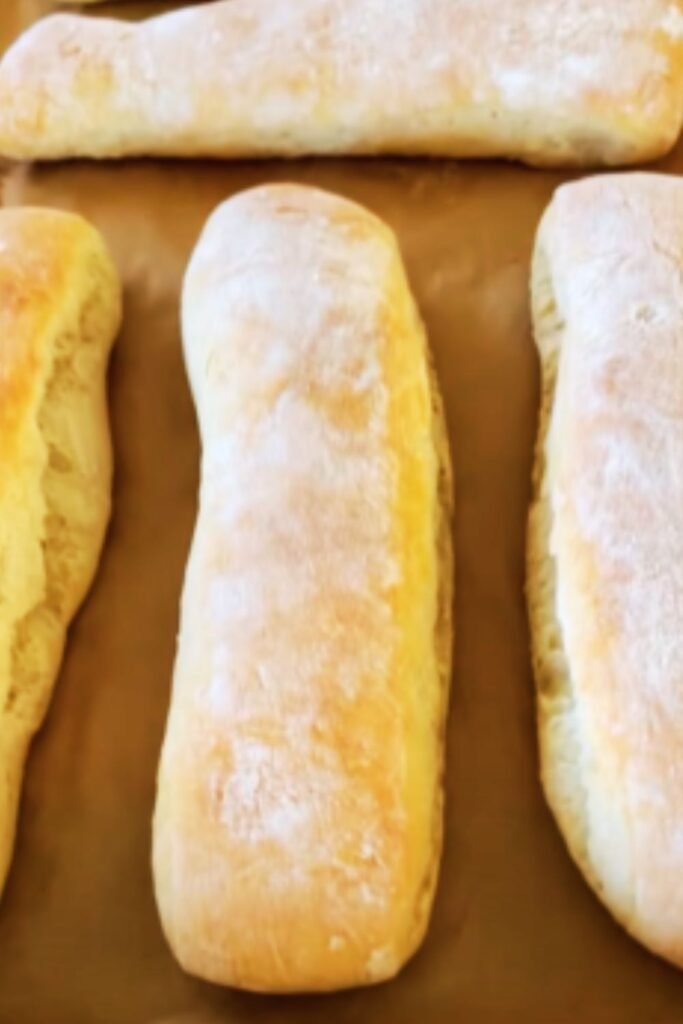
- Shape each piece by gently stretching it into a rectangle approximately 8″x6″. Be very gentle to preserve the air bubbles.
- Transfer the shaped dough to parchment-lined baking sheets, carefully maintaining their shape.
- Let the loaves proof for 30-45 minutes while preheating your oven to 450°F (230°C). If using a pizza stone, place it in the oven during preheating.
- Just before baking, spray the loaves lightly with water to help develop a crispy crust.
- Bake for 20-25 minutes until deeply golden. The internal temperature should reach around 205°F (96°C).
- Cool completely on a wire rack before slicing (at least 1 hour). This step is crucial for texture development!
Troubleshooting Common Issues
I’ve made my share of ciabatta mishaps over the years. Here are solutions to common problems you might encounter:
| Problem | Possible Cause | Solution |
|---|---|---|
| Dense bread with few holes | Under-proofed dough or dough was deflated during shaping | Handle the dough more gently and ensure adequate proofing time |
| Flat bread with no oven spring | Over-proofed dough or insufficient steam | Check proofing time and ensure adequate steam in the oven |
| Gummy interior | Under-baked or cut while too warm | Increase baking time and allow to cool completely before cutting |
| Pale crust | Temperature too low or insufficient baking time | Increase oven temperature or bake longer |
| Too much flour taste | Excessive flour during shaping | Use just enough flour to prevent sticking |
| Dough too sticky to handle | Hydration level too high for your flour | Reduce water slightly or use higher protein flour |
Tips for Ciabatta Success
After years of baking ciabatta, I’ve learned a few tricks that make a big difference:
- Be patient with the process – Great bread can’t be rushed.
- Use a digital scale – Bread baking is precision work, especially with high-hydration doughs.
- Don’t fear the sticky dough – A wet, sticky dough is essential for those beautiful air pockets.
- Create steam in your oven – Place a metal pan on the bottom rack and add boiling water when you put in the bread, or use a spray bottle to mist the oven walls.
- Trust the stretch and fold technique – It develops gluten without overworking the dough.
- Maintain the air bubbles – Handle the dough gently during shaping and transfer.
Variations to Try
Once you’ve mastered the basic ciabatta, consider these delicious variations:
Herb and Garlic Ciabatta
Add 2 tablespoons of finely chopped fresh rosemary and 3 minced garlic cloves to the dough after the autolyse period.
Whole Wheat Blend
Replace 25% of the bread flour with whole wheat flour for a nuttier flavor and added nutrition. You may need to increase the water slightly (about 2-3%).
Olive Ciabatta
Fold in 1 cup of pitted, chopped olives (black, green, or a mix) during the final stretch and fold.
Sundried Tomato and Basil
Add 1/2 cup chopped sundried tomatoes and 2 tablespoons fresh basil during the final stretch and fold.
Serving Suggestions
Ciabatta is incredibly versatile. Here are my favorite ways to enjoy it:
- Italian-style dipping: Serve with high-quality olive oil, balsamic vinegar, and a sprinkle of flaky sea salt.
- Panini base: Its sturdy structure makes it perfect for pressed sandwiches.
- Bruschetta: Toasted and topped with tomatoes, basil, and olive oil.
- Crostini: Thinly sliced, toasted, and topped with your favorite spreads.
- Soup companion: There’s nothing better than ciabatta for sopping up hearty soups and stews.
- Breakfast toast: Try it toasted with avocado, tomato, and a poached egg.
- Garlic bread: Slice lengthwise, butter, add garlic, and toast.
Storing Your Ciabatta
For maximum enjoyment, here’s how to store your freshly baked ciabatta:
- Day 1-2: Store at room temperature in a paper bag or loosely wrapped in a clean kitchen towel.
- Day 3-5: If you haven’t devoured it all (unlikely!), store in an airtight container or plastic bag.
- Long-term storage: Slice and freeze in a zip-top bag for up to 3 months. Toast slices directly from frozen.
I never store ciabatta in the refrigerator as this actually accelerates staling. If your bread has begun to harden, sprinkle it with water and reheat in a 350°F (175°C) oven for 5-10 minutes to revive it.
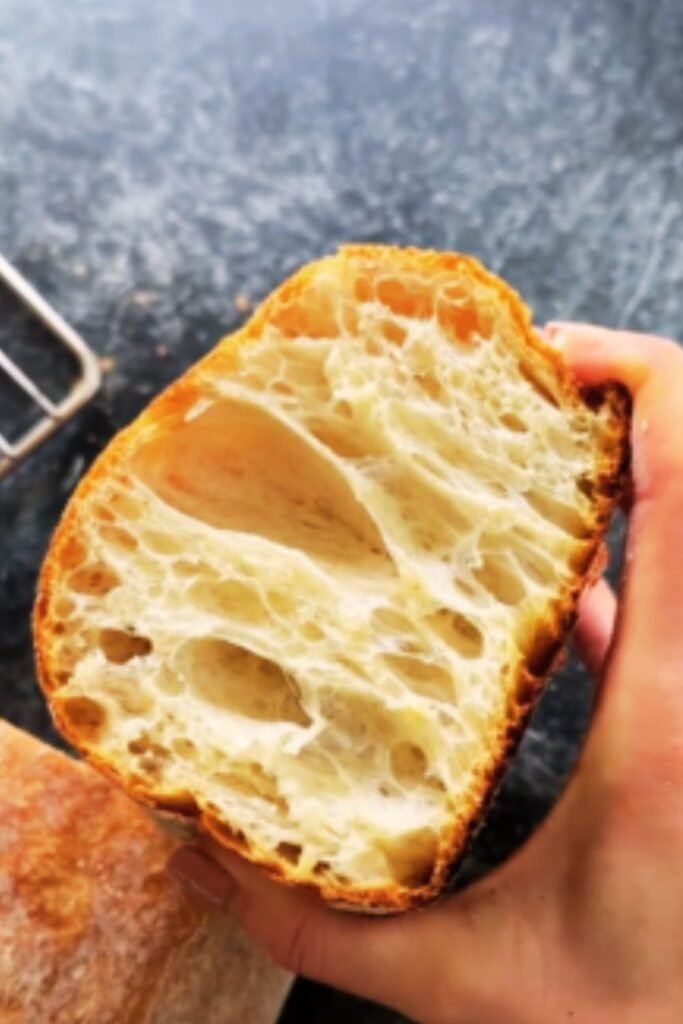
The Science Behind Ciabatta’s Holes
I find the science of bread fascinating, especially when it comes to ciabatta’s distinctive holes. These irregular air pockets (known as “alveoli” in baking terms) form through a combination of:
- High hydration: The wet dough allows carbon dioxide bubbles to expand more easily.
- Minimal handling: Unlike kneaded breads, ciabatta maintains its irregular structure through gentle handling.
- Long fermentation: The extended fermentation time allows for more gas production.
- Steam during baking: The moisture in the dough turns to steam, expanding the air pockets.
This open crumb structure isn’t just visually appealing – it creates pockets that capture sauces and oils, making ciabatta a superior choice for many culinary applications.
Detailed Nutritional Information
For those tracking nutritional intake, here’s a breakdown per 100g serving of homemade ciabatta:
| Nutrient | Amount | % Daily Value* |
|---|---|---|
| Calories | 242 | 12% |
| Total Fat | 2.1g | 3% |
| Saturated Fat | 0.3g | 2% |
| Sodium | 560mg | 24% |
| Total Carbohydrates | 46.7g | 17% |
| Dietary Fiber | 1.8g | 6% |
| Sugars | 1.5g | – |
| Protein | 8.2g | 16% |
| Calcium | 20mg | 2% |
| Iron | 1.5mg | 8% |
*Based on a 2,000 calorie diet. Values are approximate and may vary based on specific ingredients used.
Frequently Asked Questions
Q: Why is my ciabatta dough so sticky? Did I make a mistake?
No, you didn’t make a mistake! Ciabatta dough is naturally very sticky due to its high hydration level. This stickiness is actually essential for developing the open, airy crumb structure that defines ciabatta. Rather than adding more flour, use wet hands and a dough scraper to handle the dough, and trust that it will transform during baking.
Q: Can I use all-purpose flour instead of bread flour?
While bread flour is ideal due to its higher protein content, you can substitute all-purpose flour. Your bread may have a slightly less chewy texture and smaller holes, but it will still be delicious. If using all-purpose flour, reduce the water by about 15-20g to account for the lower absorption.
Q: Do I really need to wait a full hour before cutting into the bread?
Yes! This waiting period is perhaps the hardest part of bread baking, but it’s crucial. When bread comes out of the oven, the starch structure is still setting. Cutting too soon releases steam and can result in a gummy texture. The cooling period allows the crumb to set properly and the flavors to develop fully.
Q: Can I make ciabatta without making a biga first?
Technically yes, but I strongly recommend not skipping this step. The biga contributes significantly to both flavor development and texture. Without it, your ciabatta will lack depth of flavor and may not have the same irregular hole structure. If you’re short on time, even a 4-6 hour biga is better than none.
Q: My ciabatta didn’t get those big holes. What went wrong?
Several factors could contribute to a denser crumb:
- The dough was too dry
- Overhandling during shaping
- Insufficient proofing time
- Not enough steam in the oven
- Flour with inadequate protein content
Try adjusting these factors one at a time in subsequent batches to determine the issue.
Q: Can I make this recipe with a stand mixer?
Yes! While I’ve provided hand-mixing instructions (which give you a better feel for the dough), you can use a stand mixer with a paddle attachment (not a dough hook) for the initial mixing. Mix on low speed just until combined, then proceed with the stretch and fold technique as directed.
A Final Word on Ciabatta
Mastering ciabatta has been one of the most rewarding parts of my bread-baking journey. There’s something special about creating a bread with such a distinct character using just flour, water, salt, and yeast. The process connects us to centuries of baking tradition while producing something undeniably delicious.
I encourage you to approach this recipe with patience and a spirit of experimentation. Your first loaf might not be perfect – mine certainly wasn’t! But each time you make ciabatta, you’ll develop a better understanding of the dough and how it behaves. Before long, you’ll be producing beautiful, hole-filled loaves that could rival any artisan bakery.
Happy baking, and may your kitchen be filled with the incomparable aroma of freshly baked ciabatta!

