
There’s something truly magical about the aroma of freshly baked sweet rolls wafting through the kitchen on a lazy weekend morning. As someone who has spent countless hours perfecting the art of pastry, I can confidently say that these Lemon Rolls are the sunshine-filled cousin of the classic cinnamon roll that your brunch table has been missing.
Today, I’m thrilled to share my absolute favorite lemon rolls recipe that has captivated the hearts (and taste buds) of everyone who’s had the pleasure of trying them at our bakery. These pillowy-soft rolls feature a delicate buttery dough wrapped around a zesty lemon-sugar filling, topped with a luscious tangy glaze that strikes the perfect balance between sweet and citrusy.
The Story Behind Our Lemon Rolls
My journey with these lemon rolls began three summers ago during a particularly abundant citrus season. With boxes of bright, fragrant lemons sitting on my countertop, I found myself experimenting beyond the usual lemon bars and lemon curd. I wanted to create something that would showcase the vibrant flavor of lemons in an unexpected way.
After numerous test batches and tweaks to get the perfect balance of sweetness and tanginess, these lemon rolls were born. The first time I served them at a Sunday brunch, they disappeared within minutes, with everyone asking for the recipe. That’s when I knew I had created something special that deserved a permanent spot in our bakery’s rotation.
What makes these rolls truly special is the triple lemon approach – lemon zest in the dough, lemon sugar in the filling, and a bright lemon glaze to finish. It’s a citrus lover’s dream come true!
Ingredients Breakdown
For the Dough:
- 4 cups all-purpose flour
- 1/3 cup granulated sugar
- 2 1/4 teaspoons (1 packet) active dry yeast
- 1/2 teaspoon salt
- 2 tablespoons fresh lemon zest (from about 2 large lemons)
- 3/4 cup whole milk
- 1/2 cup unsalted butter
- 2 large eggs, room temperature
- 1 teaspoon vanilla extract
For the Lemon Filling:
- 3/4 cup granulated sugar
- 1/4 cup fresh lemon zest (from about 3-4 lemons)
- 1/4 cup unsalted butter, softened
- 2 tablespoons fresh lemon juice
- 1 tablespoon cornstarch (to prevent leakage)
For the Lemon Glaze:
- 2 cups powdered sugar
- 3-4 tablespoons fresh lemon juice
- 2 tablespoons unsalted butter, melted
- 1 tablespoon heavy cream
- 1 teaspoon fresh lemon zest
- 1/4 teaspoon vanilla extract
Tools You’ll Need
Before we dive into the baking process, let’s make sure you have all the necessary tools on hand:
- Stand mixer with dough hook attachment (or large bowl if mixing by hand)
- Microplane or zester for lemon zest
- Citrus juicer
- Rolling pin
- Measuring cups and spoons
- 9×13 inch baking pan
- Mixing bowls
- Parchment paper
- Serrated knife or dental floss (for cutting rolls)
- Pastry brush
- Whisk
- Plastic wrap
The Science Behind Perfect Lemon Rolls
What makes a truly exceptional sweet roll? It’s all about understanding the science behind the dough. Here’s what you need to know:
| Component | Role | Impact on Final Product |
|---|---|---|
| Yeast | Leavening agent | Creates carbon dioxide during fermentation, causing the dough to rise and creating that fluffy texture |
| Sugar | Food for yeast & flavor | Helps activate yeast, contributes to browning (Maillard reaction), and provides sweetness |
| Butter | Fat | Creates tender layers, adds richness, and contributes to flavor |
| Eggs | Structure & richness | Provide protein for structure, fat for richness, and lecithin that emulsifies the dough |
| Milk | Hydration & tenderness | The fat and sugar in milk create a tender crumb and help with browning |
| Lemon zest | Flavor | Contains essential oils that provide intense lemon flavor without additional acidity |
| Salt | Flavor enhancer | Controls yeast activity and strengthens gluten network |
Understanding these components helps us create the perfect balance in our dough. The lemon zest in the dough provides a subtle citrus note that complements the more intense lemon filling without making the rolls overly tart.
Step-by-Step Instructions
Making the Dough:
- In the bowl of a stand mixer, combine 2 cups of flour, sugar, yeast, salt, and lemon zest.
- In a small saucepan, heat milk and butter until very warm (120-130°F). The butter doesn’t need to melt completely.
- Pour the warm milk mixture into the flour mixture.
- Add eggs and vanilla extract.
- Using the paddle attachment, beat on medium speed for 2 minutes.
- Switch to the dough hook and gradually add remaining flour until the dough forms a soft, slightly sticky ball that pulls away from the sides of the bowl.
- Knead on medium-low speed for 6-8 minutes until smooth and elastic.
- Transfer dough to a lightly greased bowl, cover with plastic wrap, and let rise in a warm place for about 1 hour or until doubled in size.
Preparing the Lemon Filling:
While the dough is rising, prepare your filling:
- In a small bowl, combine granulated sugar and lemon zest. Use your fingertips to rub the zest into the sugar until fragrant and slightly moist – this releases the essential oils in the zest and intensifies the lemon flavor.
- Mix in the softened butter, lemon juice, and cornstarch until well combined.
Assembling the Rolls:
- After the dough has doubled in size, punch it down gently and turn it out onto a lightly floured surface.
- Roll the dough into a rectangle approximately 16×20 inches.
- Spread the lemon filling evenly over the dough, leaving a 1-inch border along one long edge.
- Starting from the long edge with filling all the way to the edge, tightly roll the dough into a log.
- Using dental floss or a serrated knife, cut the log into 12 equal pieces (about 1.5 inches thick).
- Arrange the rolls in a parchment-lined 9×13-inch baking pan, spacing them evenly.
- Cover with plastic wrap and let rise for 30-45 minutes, or until puffy and nearly doubled.
Baking:
- Preheat oven to 350°F (175°C).
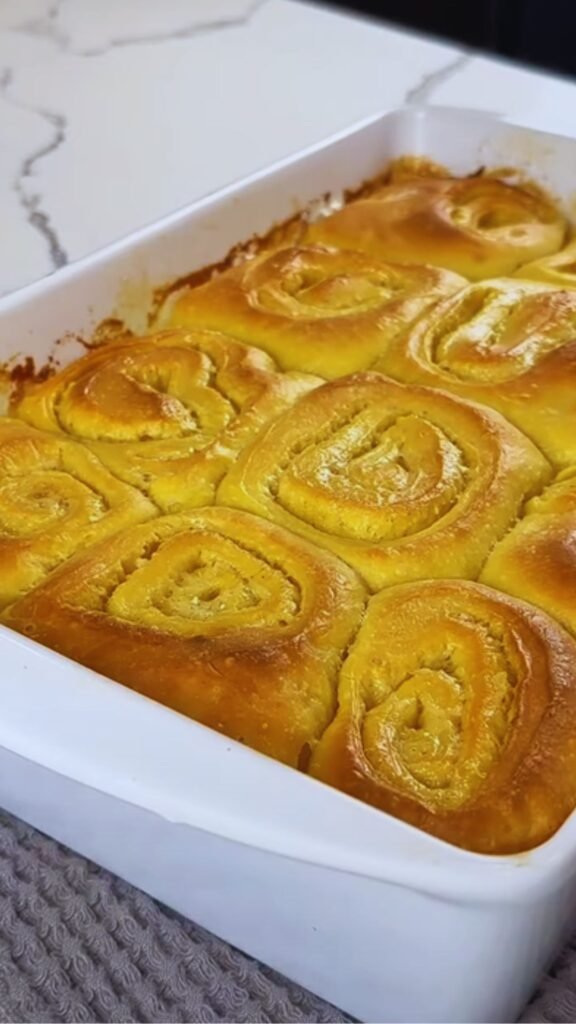
- Bake the rolls for 22-25 minutes, or until golden brown. If they’re browning too quickly, cover loosely with aluminum foil.
- Remove from oven and let cool in the pan for 10 minutes while you prepare the glaze.
Making the Lemon Glaze:
- In a medium bowl, whisk together powdered sugar, lemon juice, melted butter, heavy cream, lemon zest, and vanilla extract until smooth.
- Adjust consistency with additional lemon juice or powdered sugar as needed – it should be thick but pourable.
- Pour the glaze evenly over the still-warm rolls, allowing it to seep into the swirls and crevices.

Troubleshooting Common Issues
Even experienced bakers encounter challenges! Here are solutions to common problems when making lemon rolls:
| Issue | Possible Cause | Solution |
|---|---|---|
| Dough isn’t rising | Inactive yeast or too cold environment | Make sure yeast is fresh and create a warm environment (75-80°F) for rising |
| Filling leaks out | Too much filling or not sealed properly | Use cornstarch in filling and ensure tight rolling and proper sealing of edges |
| Rolls are dense | Over-flouring the dough or underproofing | Add flour gradually and ensure full rising time |
| Uneven roll sizes | Improper cutting technique | Use dental floss or measure carefully with a ruler before cutting |
| Rolls are dry | Overbaking | Watch carefully and remove from oven when just golden |
| Not enough lemon flavor | Old lemons or not enough zest | Use fresh, organic lemons and be generous with zest |
Storage and Make-Ahead Tips
One of the beauties of these lemon rolls is their versatility when it comes to preparation. Here are some ways to fit them into your schedule:
Overnight Method:
- Prepare the rolls through the assembly stage.
- Place the cut rolls in the prepared pan, cover tightly with plastic wrap, and refrigerate overnight (up to 12 hours).
- The next morning, remove from refrigerator and let stand at room temperature for 45-60 minutes before baking.
Freezing Options:
- Unbaked rolls: After cutting and placing in pan, wrap tightly and freeze for up to 1 month. Thaw overnight in refrigerator, then let rise at room temperature for 1-2 hours before baking.
- Baked rolls (unglazed): Cool completely, wrap tightly, and freeze for up to 3 months. Thaw at room temperature and warm in 300°F oven for 10-15 minutes before glazing.
Storage Times:
| Storage Method | Duration | Notes |
|---|---|---|
| Room temperature (glazed) | 2 days | Store in airtight container |
| Refrigerated (glazed) | 5-7 days | Microwave for 10-15 seconds to rewarm |
| Freezer (glazed) | 1 month | Thaw at room temperature for 1-2 hours |
| Freezer (unglazed) | 3 months | Thaw and add fresh glaze for best results |
Serving Suggestions
These lemon rolls are absolutely delightful on their own, but here are some ways to elevate them further:
- Serve warm with a dollop of mascarpone cheese for an indulgent breakfast
- Pair with fresh berries (blueberries and raspberries complement the lemon beautifully)
- Add a sprinkle of crushed pistachios on top of the glaze for color and texture contrast
- Serve alongside a hot cup of Earl Grey tea or a frothy cappuccino
- Create a beautiful brunch board with these rolls as the centerpiece, surrounded by fresh fruit, yogurt, and granola
- For special occasions, add edible flowers (like pansies or violets) as a garnish

Variations to Try
Once you’ve mastered the basic lemon rolls, try these creative variations:
Lemon-Blueberry Rolls
Add 1 cup of fresh or frozen blueberries to the filling for a burst of color and flavor. If using frozen berries, don’t thaw them first to prevent bleeding.
Lemon-Lavender Rolls
Add 1 tablespoon of culinary lavender to the sugar when making the filling for a sophisticated floral note.
Lemon-Cream Cheese Rolls
Blend 4 ounces of softened cream cheese with the lemon filling for a creamier, tangier result.
Meyer Lemon Rolls
When in season, substitute Meyer lemons for regular lemons for a sweeter, more complex citrus flavor.
Lemon-Thyme Rolls
Add 1 tablespoon of fresh thyme leaves to the dough for an unexpected herbal note that pairs beautifully with lemon.
Nutritional Information
For those keeping track of their nutritional intake, here’s an approximate breakdown per roll:
| Nutrient | Amount per Roll |
|---|---|
| Calories | 385 |
| Total Fat | 16g |
| Saturated Fat | 9g |
| Cholesterol | 65mg |
| Sodium | 125mg |
| Total Carbohydrates | 57g |
| Dietary Fiber | 1g |
| Sugars | 32g |
| Protein | 5g |
| Vitamin C | 8% DV |
| Calcium | 4% DV |
| Iron | 8% DV |
Values are approximate and may vary based on specific ingredients used.
Questions & Answers
Q: Can I use bottled lemon juice instead of fresh?
While you can use bottled lemon juice in a pinch for the glaze, I strongly recommend fresh lemons for this recipe. The oils in the zest are crucial for the vibrant lemon flavor, and bottled juice lacks the brightness of fresh. If you must use bottled, add an extra 1/4 teaspoon of lemon extract to compensate.
Q: My kitchen is cold – how can I help the dough rise properly?
Creating a warm environment for your dough is key. I recommend turning your oven on to the lowest setting for just 1-2 minutes, then turning it off. Place the covered dough in the slightly warmed oven with the door closed. Alternatively, place the dough bowl on top of a heating pad set to low, or near (not on) a warm radiator.
Q: Can I make these with gluten-free flour?
Yes, but with modifications. Use a cup-for-cup gluten-free flour blend that contains xanthan gum. The texture will be slightly different – a bit more tender and less chewy. You may need to add an extra egg to provide structure and an additional 2-3 tablespoons of liquid as gluten-free flours absorb more moisture.
Q: How do I get the maximum lemon flavor?
The secret is in the zest! Before juicing your lemons, wash them well and zest them using a microplane for the finest texture. Press the zest into the sugar with your fingertips to release the essential oils. Also, use unwaxed, preferably organic lemons for the best flavor.
Q: Can I reduce the sugar in this recipe?
You can reduce the sugar in the filling by about 25% without significantly affecting the texture. However, I don’t recommend reducing the sugar in the dough as it’s necessary for proper yeast development. For the glaze, you can substitute some of the powdered sugar with cream cheese for a tangier, less sweet topping.
Q: Why did my filling leak out during baking?
This is a common issue with filled rolls. Adding cornstarch to the filling helps absorb excess moisture. Also, make sure you’re rolling the dough tightly and leaving that 1-inch border on one edge. Finally, don’t overfill – an even, thin layer works best.
Q: How can I tell when the rolls are perfectly baked?
The rolls should be golden brown on top and register 190°F on an instant-read thermometer inserted into the center roll. Another test: gently press the center of a roll – it should spring back slightly and not feel doughy.
Q: My family doesn’t like things too lemony – how can I make these milder?
To create a more subtle lemon flavor, reduce the zest by half in both the dough and filling. You could also create a vanilla glaze with just a hint of lemon instead of the full lemon glaze.
Final Thoughts
There’s something incredibly satisfying about creating these lemon rolls from scratch – watching the dough rise, smelling the citrusy aroma filling your kitchen, and finally sinking your teeth into that perfect swirl of tangy-sweet goodness.
What I love most about this recipe is its versatility throughout the seasons. While we often associate lemon with spring and summer, these rolls bring a welcome brightness to gray winter mornings and complement the cozy flavors of fall.
Remember that baking is both a science and an art. Don’t be discouraged if your first batch isn’t perfect – each time you make these rolls, you’ll develop a better feel for the dough and improve your technique.
I hope these lemon rolls bring as much joy to your kitchen as they have to mine and our bakery. There’s nothing quite like seeing someone’s face light up when they take that first bite of something you’ve created with care. Happy baking!

